Quick answer
A custom packing cube is a travel organizer adapted to a brand’s needs through its size, fabric, layout, color, logo, or packaging. Start with the traveler and the luggage it must fit. Then choose a structure that solves a clear problem, such as finding clothes quickly or keeping a short-trip wardrobe together. Review the design while filled, including the opening, handles, and logo placement. Before approving production, record the agreed materials and dimensions alongside the sample. Adding your logo to an existing design may be enough when that design already works for your customer.
A wide opening can let a traveler unpack directly into a hotel drawer. A partly opaque lid can keep clothing out of view while leaving a small window for identification. These are useful starting points for a travel brand deciding how its cube should work.
The chosen function affects the pattern, materials, and way you present the product. This guide focuses on deciding what to customize and turning those decisions into a clear product specification. Great Shine’s custom packing cube sets provide a commercial starting point for discussing the selected design.
What can you customize on a packing cube?
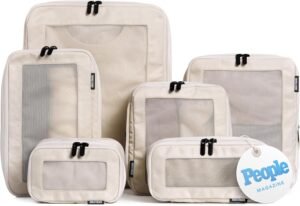
You can change the cube’s structure, materials, appearance, and presentation, subject to the supplier’s capabilities and the project requirements. Separate these decisions so the request is clear.
Structural changes include finished dimensions, opening shape, pockets, and a compression gusset. A gusset is a fabric panel that gives the cube depth or allows it to expand. Changing these features can require a different pattern and another fit review.
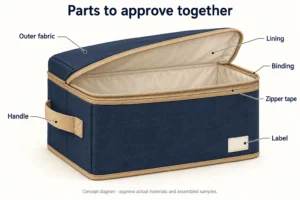
Material choices include the body fabric, mesh, lining, and components such as zipper tape and handle webbing. These choices influence the finished feel and how the cube behaves when loaded.
Appearance covers the color scheme, printed pattern, logo method, and visible trim. Presentation includes the folding method, packaging, and information customers receive with the product.
Suppliers may describe both an existing cube with a printed logo and a newly developed design as custom products. State which changes you need so the proposal reflects the work involved. A labeled reference drawing is useful when several versions look similar.
Before asking for options, note what must remain fixed. Your luggage range may determine the footprint, while a planned retail package may limit the folded size. Other details can remain open for comparison during sampling.
Which customer problem should guide the design?

Choose one main use case and design the cube around it. The customer, trip type, and luggage shape should explain why the cube has its particular features.
A customer on a short business trip may want quick access to a folded shirt. A family may need to identify whose clothes are in each cube. These uses lead to different choices about openings, labels, and layout.
Start with a specific packing routine
Describe what goes into the cube, where it sits, and how the traveler reaches it. Include the moment when the product should make packing easier.
For example, a customer might open a suitcase in a small hotel room and remove a cube containing the next day’s clothes. A wide lid and a handle in the right position may matter more than several accessory pockets.
Someone packing a narrow backpack may need a shape that slides through its opening. A cube that fits the interior on paper can still be awkward to insert when full.
Write a short use statement before choosing materials: “The customer should be able to remove one clothing group without disturbing the rest of the bag.” That gives the design team a function to evaluate.
Decide what the customer should notice
Choose a visible benefit that the product can demonstrate. Clear contents, easy access, or a compact empty form can each guide a different design.
Decide which promises the design needs to support. If the brief calls for a light cube with firm structure, discuss where that structure will come from and how much weight it adds. Require suitable evidence before adding claims such as waterproof.
List the features that support the main benefit and those that are optional. This makes later cost decisions easier because you know what can change without weakening the purpose.
Keep the first range manageable
Begin with the size or use case you understand best. Develop additional variants when they solve another identifiable problem.
Define the role of each color before adding variants. Color may identify a size or a traveler, or it may be an aesthetic choice. Record that role so the range uses color consistently.
If the question is how many pieces to include, use the separate packing cube set composition guide. Here, the focus is the design of each cube and the choices that make it useful.
How much customization does your project need?
Use the least complex development route that delivers the function and appearance you need. More changes create more details to sample, compare, and approve.
Add branding to an existing design
This route is suitable when the base cube already fits your target luggage and works for the intended clothing load. You may be able to change a label, print, or packaging while keeping the established structure.
Ask which parts of the reference product are fixed and which can change. A different fabric or logo method may still affect the surface, sewing, or finished appearance.
Inspect the exact version proposed for your project. A showroom sample made from another fabric is useful as a shape reference, but it does not confirm the result of your chosen combination.
Adapt size, fabric, or internal details
A modified design can help when an existing cube is close to the brief. You might change its depth, reduce the mesh area, or move a handle to a more useful position.
Review how each adjustment affects the finished cube. Moving the zipper changes access to the contents. Using a stiffer fabric can alter the shape of a cube made from the same pattern, so its fit needs another check.
Keep a marked drawing showing what changes and what remains. This reduces the chance that a supplier interprets a reference image as permission to copy every detail.
Develop a new structure
A new structure may be justified when your luggage, customer routine, or product feature requires a different shape. Provide the relevant measurements and the intended loading method before requesting a finished sample.
Expect to review function as well as appearance. Confirm ownership and permitted use of any artwork or design files you supply through your normal commercial process.
Whichever route you choose, record it in plain language. Terms such as private label, OEM, and ODM can mean different levels of development to different suppliers.
How should you set the size and shape?
Size the cube around usable luggage space and a defined clothing load. The outside dimensions of a suitcase do not reveal the space inside its lining, handle channels, and curved corners.
Measure the target luggage inside
Use the actual bag or a reliable internal drawing. Record the area available for the cube and any obstructions that affect its position.
If you expect several cubes to fit together, arrange full-size mockups or filled samples inside the luggage. Leave room for the other items the traveler will carry.
A neat rectangular layout on a drawing may leave awkward gaps in a curved suitcase. It may also ignore the thickness of internal dividers or the space needed to close the luggage without pressure.
For a backpack, consider the opening and the path into the bag. Check whether the traveler can remove the cube without taking out everything above it.
Define how the supplier should measure the cube
Agree whether dimensions refer to an empty finished cube, a filled cube, or another stated condition. Fabric products can change shape when packed, so a number needs a clear measurement method.
Identify the reference points for length, width, and depth. Include handles or projecting parts when they affect the space the cube occupies.
Ask the supplier to propose practical tolerances, meaning the acceptable variation from the stated dimensions. Confirm that variation against the intended fit. A tolerance that is acceptable for one cube may cause problems when several pieces must sit together.
Keep the measurement method with the specification. A photograph showing the agreed measuring position can help both teams use the same approach.
Check the opening as well as the capacity
The opening should accommodate the way the customer packs. A broad lid gives access across the top, while a more limited opening may require clothing to be placed in a particular order.
Test folded garments that resemble the intended load, including its largest or least flexible item. Soft clothing alone may hide an opening that is too narrow for the customer’s other clothes.
The cube should close without using the zipper to force an oversized load into place. If it bulges beyond the available luggage space, revise the load, depth, or shape before approving the size.
Avoid universal luggage claims
Describe compatibility with the luggage or packing arrangement you have checked. Labels such as “carry-on size” do not establish a universal fit.
IATA explains that cabin baggage allowances vary by airline, cabin class, and aircraft type. Its passenger baggage guidance is useful context, but an airline’s outer bag allowance is not a specification for a packing cube’s internal fit.
Compression can change packed volume; it does not remove the weight of the clothing. Keep size and weight considerations separate when describing the product.
How do you choose the fabric and lining?
Compare actual materials against the use case, then review them in a sewn sample. Fiber names or fabric codes alone do not establish how the finished cube will feel or perform.
Describe the finished feel you want
Provide a physical reference when possible. Explain whether you want a soft, flexible cube or one that holds its outline more clearly when partly filled.
Ask for the fiber composition, fabric construction, weight, and any coating or backing. These details make it easier to compare proposed alternatives and keep records for repeat orders.
A denier value describes yarn linear density. It does not by itself prove fabric strength, abrasion resistance, or the quality of the finished bag. Consider the weave, finish, and construction alongside that number.
Handle the proposed materials together, including the zipper and binding. A bulky zipper can feel out of proportion to a light fabric. Ask to see the combination sewn together if loose swatches leave that choice unclear.
Decide whether a lining earns its place
A lining can cover internal seams or give the interior a different surface, but it also adds another component. Decide what it needs to do.
For a light organizer, a neatly finished unlined interior may meet the brief. If the design needs a separate compartment or a particular internal finish, a lining may be useful.
Inspect seam edges and the areas where clothing will touch. Check for rough binding, exposed components, or loose fabric that can enter the zipper.
A lining alone does not establish leakproof performance. Any containment claim needs evidence for the finished structure, including its seams and closure.
Evaluate color transfer where it matters
Dark or strongly colored fabrics deserve attention when the cube will hold pale clothing. Decide with the supplier or test provider which evaluations suit the material and intended use.
AATCC TM8 evaluates color transferred from textiles through rubbing and includes dry and wet procedures. It is one possible method to discuss, not proof that a product has passed or a complete assessment of every storage condition.
Specify the required outcome with the relevant method and sample conditions. A casual fabric rub can flag a concern, but it should not be presented as a formal test report.
Be precise about recycled materials
If recycled content is part of the brief, identify the component and the claim. A recycled body fabric does not automatically make the zipper, mesh, labels, and whole finished cube recycled.
Textile Exchange describes the Recycled Claim Standard as a system for verifying and tracking recycled raw materials through the supply chain. Ask for documentation relevant to the chosen materials and product, and confirm the requirements for any certification label before using it.
Keep appearance and performance evaluation in the sample process. A recycled-content claim does not answer whether the fabric suits the cube’s intended function.
How much mesh should the cube have?
Choose the mesh area according to the need for visibility, privacy, and support. The proportion and position matter as much as the presence of mesh.
Use visibility deliberately
A mesh section lets the traveler identify part of the contents without opening the cube. Place it where the contents will be visible in the intended luggage arrangement.
A small window may be enough to distinguish clothing groups. A larger panel may be useful when the customer wants to see more of the load.
Check the view with the actual fabric colors and typical contents. A dark mesh over dark clothing may reveal less than a bright product photograph suggests.
Leave an appropriate surface for branding
A solid panel can give the logo a more predictable background and keep some contents out of view. Plan that panel before deciding on the artwork size.
Look at the cube both empty and filled. A logo near a curved corner or crowded seam may distort when the product takes shape.
If a print crosses different materials, ask to see that exact combination in a sample. Do not assume a method that works on the body fabric will produce the same result on mesh.
Define the limits of separation
Mesh leaves the contents exposed to air and does not form a liquid barrier. A separate compartment may keep clothing groups apart, but it does not automatically contain moisture or odors.
If the product includes a laundry or wet-item function, treat it as a separate requirement with its own structure and evidence. Avoid turning a general clothing organizer into a specialist containment product through labeling alone.
Which zipper and compression features should you specify?
Start with an opening that works under the intended load. Add compression only when reducing packed volume is part of the product’s purpose and the sample can demonstrate it.
Make the main zipper easy to use
Agree the zipper type, size, puller, and opening route. Ask how the selected components work with the fabric and the shape of the corners.
Operate the zipper with the cube empty and filled. Notice whether the lining enters the path, whether the corners catch, and whether the user needs to hold the fabric in a particular way.
Two sliders can provide access from different positions, but they do not solve every opening problem. The length and placement of the opening still determine how easily the customer can load the cube.
Look at the ends of the zipper and the adjacent seams. Record the agreed construction so a later sample does not use a different finish without review.
Treat compression as a complete structure
A compression packing cube usually uses an additional zipper to close down an expanded section. The fabric, gusset, seams, and zipper need to work together under the intended load.
Review the sequence the customer follows. The loading zipper and compression zipper should be easy to distinguish, especially when both sit close together.
Keep the clothing load and packing method consistent when comparing sample versions. Photograph how the filled shape changes as the compression zipper closes. If the intended contents include stiffer garments, include them in the review rather than relying only on soft knitwear.
Avoid a universal percentage reduction unless a defined method and supporting results justify it. The customer needs to understand what the structure does and the conditions in which the benefit applies.
If compression adds little value to the selected use case, a standard cube may leave more budget for a better opening, clearer organization, or a more suitable fabric.
How should you add a logo and brand colors?
Apply branding where it remains clear during use, and choose a method that suits the actual material. Use the digital image to review the artwork, then approve its size and position on the finished cube.
Choose the surface before the decoration method
Identify a panel that stays visible in the intended packing arrangement. Leave enough space around seams and openings so the logo does not appear crowded.
Consider whether the customer sees the cube mainly from above, by its handle, or from the side of a backpack. The most prominent position in a studio photograph may not be the most useful one in the luggage.
A small mark on a solid panel can be easier to reproduce across sizes than artwork that stretches over several seams. Large graphics are possible design choices, but their alignment needs a clear reference.
Compare methods using the selected fabric
Printing may suit a flat artwork area, while a woven label provides a separate branding component. Embroidery, transfers, patches, or other methods need review against the chosen material and construction.
Ask for a sample showing the actual logo, its smallest details, and its intended size. A generic supplier logo cannot show whether your fine lettering or narrow lines will reproduce clearly.
Review the inside of the decorated panel as well. Check how the attachment or finish interacts with the clothing and whether extra backing affects flexibility.
Confirm the artwork version, colors, and placement measurements. Keep the approved production file separate from rough mockups so the supplier knows which one controls the order.
Coordinate color across different components
Body fabric, mesh, zipper tape, and binding may look different even when each is described with the same color name. Compare them together under the agreed lighting conditions.
Use a physical reference or an agreed color standard where appropriate. Record which component acts as the main reference and whether the other parts should match or deliberately contrast.
For a set, review all sizes at once. The same label position measured from an edge may look different on a smaller panel. Decide whether the position should stay fixed or change by size.
A photograph is useful for records, but screen settings can affect how colors appear. Keep the approved physical references available when color consistency matters.
Make useful information easy to find
Separate decorative branding from information the customer needs. A size marker or care label should remain readable without dominating the exterior.
Avoid placing essential instructions only on packaging that the customer will discard. If the cube needs a particular closing sequence or handling instruction, choose a practical way to keep that guidance with the product.
Which small details affect daily use?
Handles, pockets, and identifying marks should support a clear action. Each extra part needs space and can affect how the cube folds or sits in the luggage.
A handle is useful when the customer can reach it in the packed arrangement. Check whether its length gives enough grip and whether it lies out of the way when the suitcase closes.
Agree whether the handle is intended to lift the filled cube or only to help pull it from a compartment. Review the attachment with the expected contents instead of judging it from an empty sample.
An external pocket can keep a small item accessible, but it can also add an uneven layer. Define what goes inside and include that item in the fit review.
An internal divider may help separate outfits or users. Check whether it creates two usable spaces or leaves one side too shallow for its intended role.
Size tabs can help the traveler identify a cube without opening it. Use a consistent naming system so the label on the cube agrees with the product information.
Before keeping any extra detail, describe the action it supports. If a pocket has no defined contents or an extra handle has no useful position, consider removing it and reviewing the simpler sample.
How do you review a custom packing cube sample?
Review the sample against the written brief while using the intended contents. Separate appearance, fit, and function so a good result in one area does not hide a problem in another.
These are development checks to agree with the supplier. They are not a claim that Great Shine or another manufacturer has completed a particular test.
Check what the sample represents
Record the sample version and identify any substitutions. The first sample may show the proposed pattern while using a temporary color or component.
Make those limits explicit. Approval of the shape should not accidentally become approval of an unreviewed logo finish or substitute zipper.
List the unresolved details beside the sample version. For each one, state what you need next, such as the correct fabric swatch or a revised opening. That record lets the team approve the completed details without losing track of unfinished work.
Review fit in the intended luggage
Pack the agreed clothing load and position the cube in the target bag. Close the luggage with the other items that form part of the use case.
Observe the cube’s shape, the remaining space, and the accessibility of its handle. Check whether the traveler can reach the contents in the planned order.
Photograph the arrangement from a useful angle and identify the luggage reference. This helps the next reviewer repeat the same check instead of using a different bag and drawing another conclusion.
Review opening and handling
Open and close the filled cube, remove it from the luggage, and set it down as the customer would. Watch for catches, distorted corners, or movement at handle attachments.
For repeat-use or load testing, agree a method, conditions, and acceptance criteria before treating results as evidence. The number of repetitions should come from the product requirement and test plan, not an arbitrary marketing claim.
Inspect the sample after handling as well as before it. Note the location and circumstances of any problem so the supplier can investigate the cause.
Give feedback that leads to a specific revision
Describe the observed issue, the intended result, and the part that may need review. For example: “The filled cube catches at the backpack opening; review its depth and corner shape.”
Avoid prescribing a solution before understanding the cause. A difficult zipper may reflect overfilling, fabric entering the path, or the geometry of the opening.
When a revision arrives, repeat the relevant check using the same conditions. Keep the earlier version identified so the team can see what changed.
How do packaging and cost affect the design?
Evaluate the complete selling unit alongside the cube. Packaging, labels, and the folding method can change the space needed to ship and display it.
Define how the customer receives the product
Decide whether the cube is sold alone, bundled with another size, or included with luggage. Each format needs a clear component list and a suitable presentation.
A paper band, pouch, or box can serve different display needs. Compare them using the actual folded product so the team sees what the customer will receive.
Avoid a package that forces permanent-looking creases through the logo area or crushes a component. Unpack a sample after it has been packed in the proposed way and inspect its appearance.
Make sure the packaging distinguishes the cube’s filled dimensions from the dimensions of the retail pack. These numbers answer different questions.
Compare quotations on the same basis
Supply the same material, size, branding, and packaging brief when comparing proposals. Ask each supplier to identify assumptions or alternatives separately.
A lower figure may refer to a different fabric, logo method, or packing arrangement. Those differences should remain visible when the team compares cost.
Confirm the unit of quotation. One cube, one complete set, and one carton are different quantities, especially when several sizes share a program.
Ask how changes in order quantity or color count affect the proposal. There is no universal minimum quantity or lead time for every custom packing cube design.
Protect the feature that gives the product its purpose
When reducing cost, return to the main use case. Removing an unused pocket may have little effect; narrowing the opening may undermine the reason the customer chooses the product.
Compare alternatives in a sample where they affect use or appearance. Record the chosen option so later cost discussions do not reopen already settled details without review.
What does a clear design brief look like?
A useful brief connects a customer problem to specific product choices and a way to review them. The following example illustrates that process; it is not a Great Shine customer case or a tested product specification.
Example: a cube for a short business trip
A travel brand wants a cube for customers who pack a small wardrobe in a compact suitcase. The intended benefit is easy transfer from luggage to a hotel drawer.
The brand starts with the suitcase it sells and a representative group of folded clothes. It measures the available interior and confirms where the cube should sit beside the other travel items.
The first design uses a broad lid so the customer can see and remove the clothes without emptying the whole cube. It includes a reachable handle and a partly solid lid to provide some privacy.
Compression is left out of the first version because the immediate need is access and organization. The team can reconsider it if a later review shows a useful reason to reduce the packed volume.
Translate the idea into reviewable details
The drawing identifies the finished dimensions, opening route, handle position, and mesh area. The material brief describes the intended feel and lists the proposed fabric and components for sampling.
The logo sits on the solid lid panel. Its position is checked with the cube filled because the surface changes shape when it holds clothing.
The packaging brief describes one cube sold as a separate accessory. It includes the folding arrangement and space for the required product information.
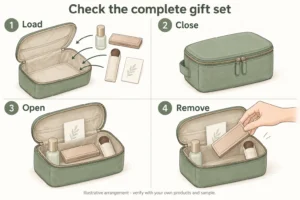
The sample review follows the stated routine: pack the selected clothes, place the cube in the suitcase, remove it by the intended handle, and open it in the drawer.
Use the findings to choose the revision
Suppose the cube fits the suitcase but its handle is difficult to reach. The team first reviews the handle position instead of immediately making the entire cube smaller.
If the logo folds across a seam in the retail package, the team reviews its placement or the folding method. A new print process is unnecessary unless the evidence points to that issue.
The final brief records these decisions and the version that was approved. The team can then compare a later sample with the approved handling sequence, shape, and logo placement.
What should be confirmed before the design is approved?
Confirm the product details that another person would need to reproduce and review the cube. The approved sample and written specification should describe the same version.
Keep the following together:
- The intended use and reference luggage.
- Finished dimensions and the agreed measurement method.
- Material and component references, including approved colors.
- Construction details for the opening, seams, handles, and any compression panel.
- Final artwork, branding method, and placement.
- The component list and retail packing arrangement.
- Agreed review methods, acceptance criteria, and open items.
Identify who can approve changes. If a material or component becomes unavailable, review the proposed replacement before treating it as equivalent.
For the quotation documents that follow this design work, use the separate custom travel bag RFQ checklist. It covers the broader information needed to compare and discuss supplier proposals.
Frequently asked questions
Can I order a custom packing cube with only a logo change?
Yes, if the supplier offers branding on a suitable existing design. Confirm the exact base product, decoration method, logo position, and packaging. Review a sample of that combination, especially when the proposed fabric differs from the reference you first saw.
Do I need a technical drawing before contacting a supplier?
A clear drawing helps, but you can start with reference photos, luggage measurements, and a description of the intended use. Explain which details you want to keep or change. The design should still become a documented specification before final approval.
Is nylon or polyester better for custom packing cubes?
Neither fiber name settles the choice. Compare the proposed fabric’s construction, weight, finish, and behavior in the cube. Ask for material references and a sewn sample. The better option is the one that meets the agreed requirements for that design.
Can one packing cube fit every carry-on suitcase?
A universal fit claim needs more evidence than a general size label. Suitcases vary in internal shape and usable space. Define the luggage references or internal dimensions your design was checked against, and give customers enough measurements to assess other bags.
Will a compression zipper reduce baggage weight?
A compression zipper can reduce the volume of a suitable clothing load, but it does not remove the clothing’s weight. The extra cube components also have weight. Describe the space-saving function separately from any claim about how much the traveler can carry.
Can the same logo size be used across a whole set?
It can, but it may not look balanced on every panel. Review all sizes together and check the artwork while each cube is filled. Record any size-specific placement or scaling so the supplier can reproduce the intended appearance.
Are custom packing cubes machine washable?
That depends on the complete product, including its fabric, coating, print, labels, and components. Ask for care instructions supported by the selected construction and any relevant evaluation. Do not infer machine washability from the body fabric alone.
How can I choose between two similar samples?
Use the same luggage, clothing load, and review method for both. Record differences in access, shape, handling, appearance, and packed presentation. Decide against the priorities in the brief so an attractive extra feature does not outweigh a problem with the main function.
Develop your custom packing cube with a clear brief
Start with the traveler, the luggage, and the action the product should make easier. Use those decisions to choose dimensions, materials, and branding, then review the combination in a filled sample.
To discuss a project with Great Shine, share the intended use, reference images, target dimensions, quantity, and branding direction through the custom packing cube development page. Include the packaging needs and the decisions that are still open.
Ask for a proposal that identifies the suggested structure and the details to confirm during sampling. Keep the final choices in one specification so the approved design remains clear when the project moves forward.