
To choose a logo for a fabric storage bin, confirm the artwork, its actual size and position, the selected fabric and how the product folds. Then compare printing, embroidery and woven labels on that combination. Approve the result on an assembled sample and again in its folded retail packaging, where the logo may face a different direction or become covered.
A computer mockup is useful for agreeing on a design direction. The sample shows what happens at seams, over a textured surface and when the bin is filled. Make those checks before approving the decoration for a production order.
Set the design brief before choosing a process
Decide what the customer should see when the bin is in its usual position. A small woven label beside a handle can identify a brand discreetly. A larger printed mark may be easier to read across a retail display. Neither is automatically the more suitable choice for every range.
Confirm these details together:
- The current brand artwork, spelling and any required tagline.
- Finished logo width and height, with units.
- The exact panel and the logo’s position on that panel.
- Fabric composition, color, texture and any coating or backing.
- Whether the bin folds inward, collapses flat or has removable inserts.
- How the logo should appear on the filled bin and in the retail pack.
Use the same artwork revision in the quotation, sample request and approval record. If the logo changes after sampling, identify what changed before relying on the earlier approval.
Compare printing, embroidery and woven labels
Ask what each proposed method involves on your selected fabric. Record the details below with the sample request.
| Option | Details to confirm | What to check on the sample |
|---|---|---|
| Printing on the panel | Actual print method, colors, artwork detail, coverage and fabric compatibility | Clear edges, readable small text, color against the fabric and behavior at the intended fold |
| Embroidery | Stitch file, design size, thread colors, density, backing and assembly stage | Letter shape, fabric distortion, loose threads, reverse-side finish and contact with the lining |
| Woven label | Finished label size, weave, colors, fold style, seam allowance and attachment | Readability at actual size, exposed edges, orientation and secure stitching in the agreed position |
Printing: specify which method is proposed
For a simple spot-color mark, discuss screen printing on the chosen panel. For gradients, fine detail or multi-color artwork, ask which process the supplier proposes and why it suits that fabric. The word “print” alone does not distinguish direct printing from a transfer or another process.
Ask whether a base layer or other preparation is needed and review the result on the intended fabric color. If a transfer is proposed, inspect its edges and the decorated area after normal folding. Agree on any adhesion or care checks before testing; do not treat an unrecorded rub with a finger as a durability rating.
Embroidery: inspect the fabric as well as the stitches
Review the smallest lettering at its final size. Fine artwork may need adjustment when converted to stitches, so approve the resulting stitch sample rather than only the original vector graphic.
Backing choice depends on the fabric and design. Embroidery supplier Madeira identifies fabric stability, stitch density and design size among the considerations in its backing guidance. That guidance supports checking the whole combination; it is not evidence that a particular storage bin has passed a test.
Look for puckering around the mark and inspect the reverse side. Confirm how stitching and backing interact with the lining or board pocket. The supplier should establish the decoration sequence before assembly, especially where reinforcement will restrict access to the panel.
Woven labels: approve the finished visible area
A label has its own construction before it is sewn to the bin. Confirm the cut size, folded size and visible branded area so artwork is not lost in a fold or seam.
Check which way the label faces when the bin is filled and on the shelf. Inspect the attachment and exposed edges. Keep the label approval and its placement approval linked; a correct label sewn into the wrong seam is still a different result.
Review the same artwork on the actual fabric
Fabric texture can interrupt fine edges, and a dark ground can change the appearance of a printed color. Thread sheen and woven-label texture also look different from a flat screen image. Compare the proposed decoration with the agreed physical color reference under consistent viewing conditions.
Use an undecorated swatch and a decorated sample of the same material when discussing a difference. Record the fabric reference alongside the artwork version. Approving a print on one fabric does not approve it on a substitute material or every colorway.
For a coordinated range, our guide to matching colors across storage products explains how to review components together. Keep this logo review focused on its own color, detail and position.
Mark the position around folds, seams and handles
Specify a repeatable reference point, such as the finished left panel edge and the finished top edge. Mark the offset to the logo’s edge or center and state which one you mean. “Centered on the front” is ambiguous if a handle, window or binding changes the usable area.
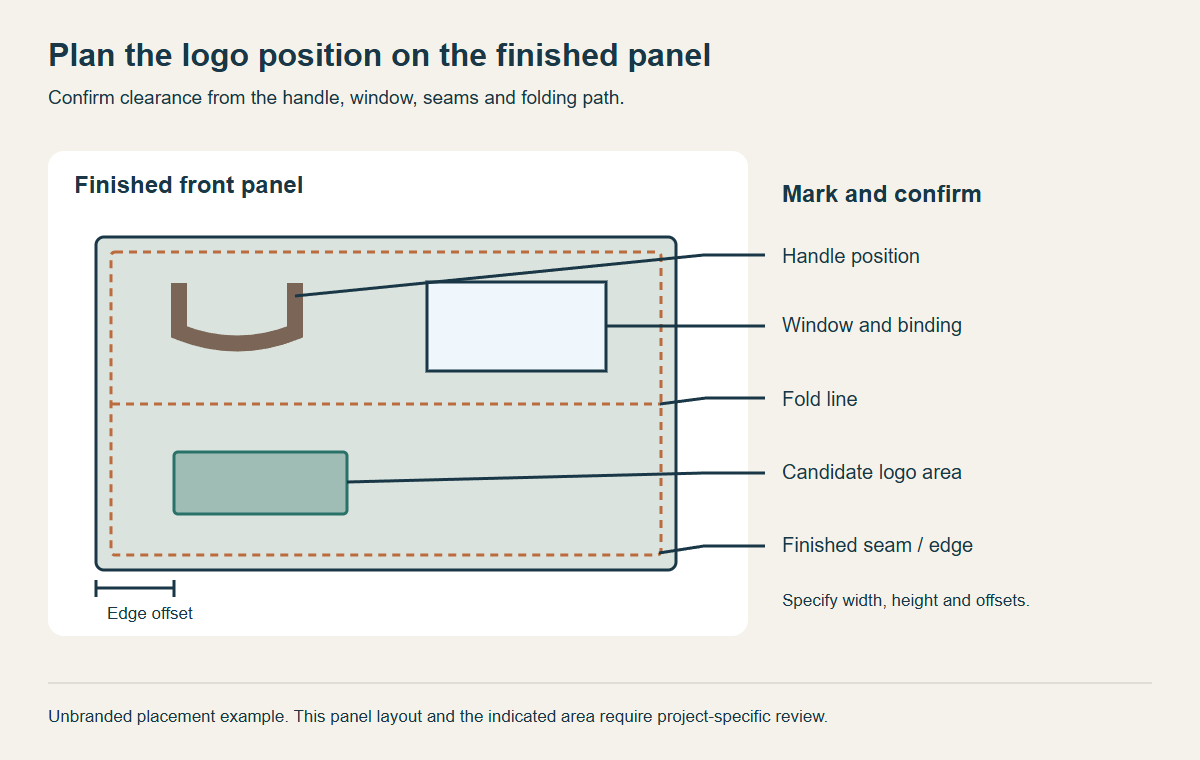
Placement planning example. The marked area is illustrative; the factory must confirm clearances and the finished position for the actual construction.
Check the logo against the folding sequence. A mark that appears clear on an upright panel may sit directly on a crease when the box is flattened. Keep the drawing and folding instructions together so the supplier can assess that interaction.
Where there is a window, mark its finished edge and any surrounding binding. Check whether a handle obscures the logo in its resting position or crosses it when lifted. For a label sewn into a seam, show the visible portion after stitching, not only the unsewn label outline.
Send an artwork and placement file set
Send the following files and references so the supplier can work from the intended size, color and position:
- Original editable artwork, preferably vector for a logo, plus a viewable PDF reference.
- Fonts outlined or supplied as agreed, and linked images included where relevant.
- Color references with the matching system identified; include a physical sample when one is the approval standard.
- Finished artwork dimensions and a marked panel drawing with position offsets.
- Product style, fabric reference and colorway list.
- Folding method, proposed retail packaging and the required outward-facing panel.
- A file version and a named person responsible for approval.
Confirm the production file requirements with the supplier. Embroidery needs a stitch program, while a woven-label producer may need its own development file. Do not assume a customer must prepare machine-ready embroidery data just because the logo artwork is supplied as a vector.
Approve three product states
Review the assembled, folded and packed product. These checks answer different questions and should use the same sample revision.
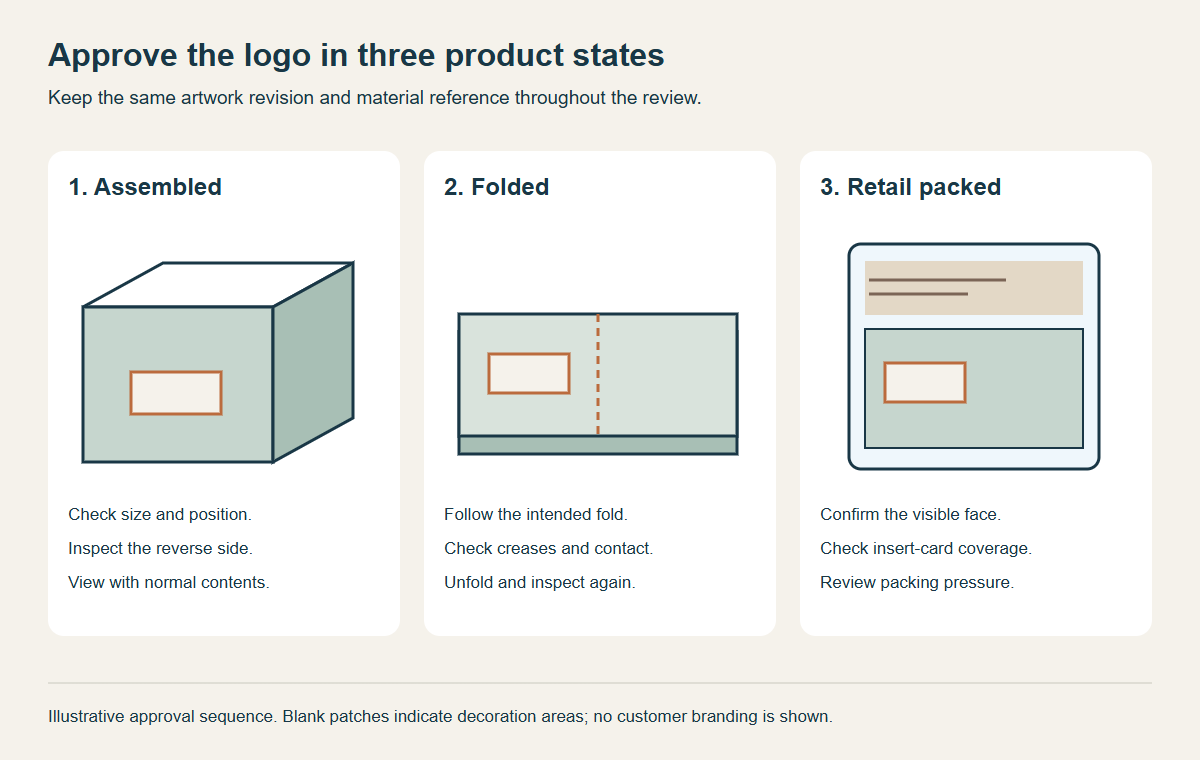
Illustrative approval sequence. This diagram is not a photograph of a customer project or evidence of print, embroidery or folding performance.
Assembled and filled
Use representative contents to see the normal panel shape. Check logo size, position, color and legibility. Look at it from the expected shelf-viewing direction, then inspect the reverse side and any nearby handle attachment or window seam.
Folded for packing
Follow the intended folding instructions. Record whether the decoration falls across a crease, rubs against another component or becomes hidden. Unfold the sample and inspect it again. Record observations and agree on further checks if the design requires repeated folding or a specific care claim.
Inside the retail packaging
Pack the approved sample with the intended insert, label or hanging fixture. Check which face is visible, whether the insert covers the mark and whether packaging presses against a raised decoration. The product logo and packaging artwork should use the agreed brand version.
Keep photos of all three states with the approved artwork, material reference and written decisions. Log each requested revision by location and issue, such as “lower edge of label hidden in the binding,” so the next sample can be assessed against a clear correction.
Confirm the option for your storage bin
Great Shine’s custom storage boxes and fabric bins page lists logo and packaging options to discuss for a project. Send the selected style, artwork, actual logo dimensions and folding requirements so the proposed method can be reviewed on the intended construction.
Use only branding you own or have permission to reproduce. For a public case study, obtain separate permission to show the customer’s brand and project details. Unbranded diagrams are sufficient for discussing position while that permission is unresolved.
Frequently asked questions
Can one approved logo be used across several bin sizes?
The artwork can remain the same, but confirm its size and placement on each product. A handle, window or fold may move as the bin dimensions change. Record separate placement drawings where needed.
Can I approve the logo from a photograph?
A photograph helps communicate position and visible defects. It cannot fully show feel, reverse-side finish or color under your viewing conditions. Agree which physical sample and references control the final approval.
Is a woven label always easier than printing?
It has different requirements. The label must be developed, positioned and attached, and the seam must suit the assembly. Compare the complete proposal, including sample development and placement, rather than assuming one method is always simpler.

