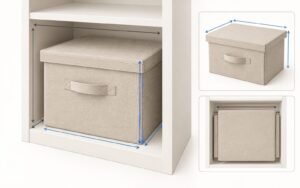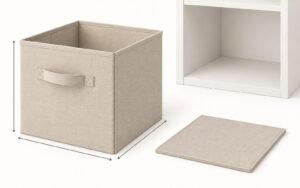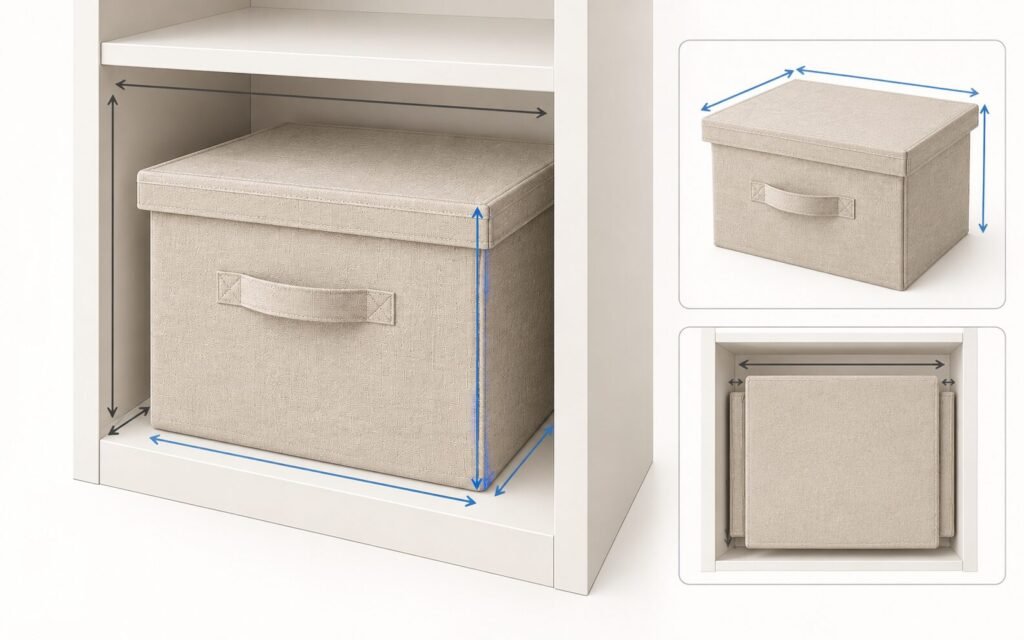
Custom fabric storage bin sizes should start with the shelf’s usable opening. Measure its clear width, depth and height, allow space for handling, then account for the bin’s largest permitted finished dimensions. Include anything that projects beyond the body, such as a lid edge or handle. Check the result with a sample in the intended shelf before approving production.
A size described as “13-inch” or “medium” leaves too much open for a custom order. Buyers need to know which direction the measurement describes, whether the lid is included and how the bin behaves when filled. Write those conditions beside the dimensions so the supplier and sample reviewer measure the same product state.
Quick answer: how do you determine the right bin size?
Measure the smallest usable opening along the bin’s insertion path and in its final position. Subtract the space needed to insert, remove and use the bin. The remaining space is the maximum permitted outside size in that direction, including relevant projections and the agreed loaded shape.
The nominal size on the drawing must also leave room for positive manufacturing variation. Keep the assembled external size, usable interior, folded product and packed dimensions in separate fields. They serve different purposes and should not share a single ambiguous “size” entry.
For a retail set, check each size on its own and then check the intended arrangement. Two bins sold together may occupy separate shelf openings, sit side by side or nest only for shipping. State which arrangement the set is designed for.
Measure the shelf opening and the route into it
Measure the space the bin can actually occupy, rather than using the furniture’s overall dimensions. Side panels, a back panel, door hinges and shelf supports can reduce that space.
Give each target shelf or compartment an identifier. Record the furniture model if known and attach a photo or sketch showing the measurement points. Where a retail range must fit several shelf models, keep their measurements separate until you have identified the limiting opening.
Width and height
Measure the clear width at the front, farther inside and near the back. Check more than one height if the sides are not parallel. Record the smallest relevant width and the location where it occurs.
Measure clear height from the shelf surface to the obstruction above it. Include any front rail, bracket or door hardware that the bin must pass. A tall box can fit inside a compartment yet fail to pass through its opening.
Use the shelf in its installed condition. If the bin will be used beneath another loaded shelf, check the available height in the intended setup while respecting the furniture’s load limits. Do not assume every compartment in the same unit has identical clearance.
Depth and front access
Measure usable depth from the chosen front limit to the rear obstruction. Define the front limit: the shelf edge, the inside of a closed door or another agreed plane. If any overhang is permitted, record how much and confirm that the remaining support is suitable.
A fabric handle may hang forward without increasing the rigid body depth, but it still matters if a door must close. Check its normal resting position and the space needed to grip it. A cupboard hinge can also obstruct the bin during removal even when the closed bin fits behind the door.
Photograph the tight points. The supplier needs to see whether a limitation comes from the whole compartment or a small obstruction along the insertion path.
Convert the opening into a finished-size limit
For each direction, begin with this relationship:
Maximum outside dimension in use + required operating clearance ≤ minimum usable shelf opening.
“Outside dimension in use” means the largest relevant span of the assembled bin, with its lid, handles and other projections in the agreed position. Operating clearance is the additional space needed for the intended movement or access. Define it separately from the variation allowed in manufacturing.
There is no single clearance that works for every fabric bin. An open-top bin pulled out by a front loop has different access needs from a box whose lid must open inside the shelf. Use the calculation to set a proposed limit, then check the handling on a sample.
Worked example: width only
The following numbers are hypothetical planning values, not Great Shine product specifications or recommended industry tolerances.
Suppose the smallest shelf opening is 340 mm wide. The buyer initially allows 6 mm of clearance on each side, or 12 mm in total. The largest acceptable outside width in use is therefore:
340 − 12 = 328 mm.
For this example, the supplier proposes an empty assembled width tolerance of ±4 mm. The buyer also reserves 6 mm of additional total width for bulging with the specified contents. That 6 mm is across the whole width, not on each side.
The nominal empty outside width can then be no greater than:
340 − 12 − 4 − 6 = 318 mm.
At the upper manufacturing limit, the empty bin would be 322 mm wide. With the allowed additional bulging, it would occupy 328 mm, leaving the proposed 12 mm total clearance.
Check these allowances on the sample. More bulging would require a change to the design or size; difficulty gripping the bin would require a review of the access space. Include each projection once, so a lid overhang already covered by the outside width is not deducted again.
Apply the method separately to depth and height
Depth must account for the front and rear limits, including any relevant handle or lid projection. Height must account for the closed product and the access method. A lid that lifts off may require space above the box that is not needed when the whole box is removed before opening.
Record the permitted range for each measurement. The positive tolerance matters for shelf fit, while the lower limit may matter for internal capacity or the appearance of a coordinated set. The supplier should confirm the achievable range for the selected construction.
Identify what handles, lids and support boards change
A handle outside the side wall or a lid wider than the body can become the point that catches on the shelf. Support panels also affect the assembled shape. Mark these parts on the drawing and measure the completed bin.
Handles and grip space
A side handle may project beyond the nominal body width. A front loop affects door clearance and how far the user needs to reach. Record the projection in its resting position and the space needed to use it as intended.
If a handle must lie flat for the bin to fit, make that condition visible in the specification. Check whether it stays in that position during ordinary use. Avoid approving a fit that depends on manually tucking the handle into a different position every time.
Lids and closures
Measure the closed lid at its widest and deepest points. An overhanging lid can be larger than the body below it, and a raised top changes the overall height. Record body-only dimensions separately when they are useful for manufacturing.
Decide whether the lid opens in place or after the bin is removed. For an attached lid, check the opening movement against the shelf above and the rear wall. For a removable lid, check the lift needed to release it and the space available to hold it.
A zipper pull, tab or closure can catch on a nearby edge. Include these details in the fit check instead of evaluating only a plain rectangular body.
Support panels and the base insert
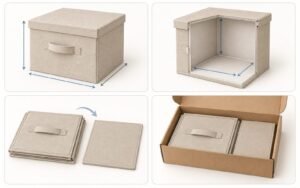
Measure a collapsible bin with every required support panel installed. A removable base can spread the walls into their working shape, while the panel covering and corner seams affect the interior.
Do not calculate usable width by subtracting twice the board thickness from the outside width alone. Fabric layers, folded edges, seams and wall shape also take up space. Measure the completed interior at the points that matter to the intended contents.
Keep base-panel dimensions separate from bin dimensions. A panel needs to sit correctly within its pocket or base area; it should not be enlarged until it forces the walls outward. Record any material or panel change that requires the fit to be checked again.
Separate the different dimensions in the product record
Label dimensions by product state and include a sketch where the orientation could be unclear. Keep the assembled measurements used for shelf fit separate from the folded and packed measurements used to plan packaging.
Assembled external dimensions
These describe the completed bin’s outside width, depth and height in a stated condition. Identify the front face on the drawing. Include the lid and relevant projections, or list them separately with a clear overall limit.
Record empty dimensions and check the shape with the agreed contents. Measure the widest points instead of pressing the sides inward to reach a target. If the bin tapers, note the top and base dimensions and use the limiting section for fit.
Usable internal space
Measure the space available inside the assembled bin, with its base, lining and dividers installed. Specify minimum clear dimensions when particular items must fit. Also check the opening through which those items enter.
A wide interior below a narrower rim may accommodate an object once inside but prevent it from passing through the opening. An item-fit check can therefore be more useful than a single volume figure. Do not derive a usable capacity claim from external dimensions.
Folded product dimensions
Measure the bin after following the agreed folding sequence. State whether the base insert and lid are folded within the body or placed alongside it. Record the full folded stack and any loose components.
Keep the compression condition consistent. A measurement taken while a person presses down on the fabric will differ from the thickness of the product lying freely. The agreed folding and restraint method should be reproducible during packing.
Retail-pack and master-carton dimensions
Measure one complete selling unit in its selected retail packaging. Include the sleeve, bag or box, inserts and all products in the set. This is the size relevant to a packaged shelf display or an outer shipping pack.
Then record the closed master carton’s external dimensions, the number of retail units it contains and the packing layout. Measure the completed carton, including any bulging. Do not substitute folded-bin dimensions for packed dimensions or multiply a single bin’s dimensions to invent a carton size.
If an assembled sample is displayed in store while stock is sold folded, record both display fit and retail-pack fit. They are separate approvals.
Plan sizes for a retail set
A set needs a defined arrangement as well as a piece count. Specify whether the bins must sit together on one shelf, fit separate compartments or nest for transport. A three-piece set name does not establish any of those relationships.
Several bins side by side
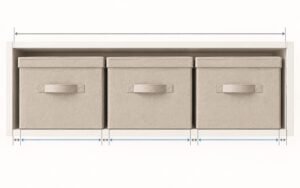
For a continuous shelf, add the maximum widths of all the bins, the gaps between them and the clearances at both ends. The total must fit within the usable width. Apply the same check to the chosen depth and height.
For example, consider a hypothetical 1,000 mm clear shelf with three equal bins. If the buyer proposes 10 mm at each end and 10 mm between adjacent bins, the total reserved space is 40 mm. That leaves 960 mm for the bins, or a maximum in-use width of 320 mm each.
That 320 mm already needs to include the permitted positive variation, relevant projections and loaded shape. It is not automatically the nominal width to send to the supplier. The proposed gaps also need a sample check for access.
For separate cubbies, measure each opening individually. Dividing the furniture’s overall width by the number of cubbies would include panels and other space that the bins cannot occupy.
Mixed sizes and nesting
Give every size its own dimensions and quantity. Confirm whether the largest bin holds the smaller bins assembled or whether all pieces are folded for packing. Those arrangements produce different requirements.
For assembled nesting, check the smaller bin’s maximum exterior against the larger bin’s minimum interior and opening. Include lids, handles and any packaging used between the pieces. Review insertion and removal as well as the final nested position.
A successful nesting check does not demonstrate that filled bins can be stacked safely. If stacking is part of the intended use, evaluate it separately with agreed loads and construction criteria.
Check shelf fit during sampling
Review the sample in the condition customers will use it. A dimension report should accompany a physical fit check, since measurements alone may miss grip access or a snagging lid.
- Identify the sample version, drawing revision and target shelf. Assemble the sample according to its instructions, with the correct base and lid. If it needs time to settle after unpacking, agree and record that condition.
- Measure the empty exterior at the defined points. Record actual results beside the target and allowed range. Use straight measuring references where a flexible tape could follow a curved wall and overstate the span.
- Insert and remove the empty bin through the full access path. Check the handle, door movement and lid operation in the intended sequence. Note any need to squeeze, tilt or hold parts aside.
- Repeat with agreed representative contents, within the product and shelf limits. Record the contents and how they are arranged so that another reviewer can repeat the check. Look for changed wall shape and contact with the compartment.
- Check the complete retail set together. For a multi-model compatibility claim, check each target shelf model or an agreed fixture representing its limiting dimensions and obstructions.
- Fold and pack the sample using the proposed instructions. Record folded dimensions, retail-pack dimensions and the complete set contents. Confirm the master-carton arrangement separately if it is part of the sample review.
- Record the outcome and any required revisions. Identify the approved sample, photographs and measurement sheet so production and inspection teams use the same reference.
A simple rectangular fixture can help when the actual shelf is unavailable, but it must represent the relevant opening and access restrictions. It will not reproduce every door hinge, surface or furniture variation automatically. Record what the fixture checks and what still needs review on the actual shelf.
Agree on sample quantity and the production inspection approach separately. One sample that fits does not demonstrate that every unit will meet the dimensional limits. A change to panels, seams, lids or handles should trigger a review of the affected dimensions.
Customer dimension confirmation sheet
Use one sheet per bin size, with a shared set-layout reference if needed. Enter values with units and mark non-applicable fields. Empty cells are for the buyer and supplier to complete; unresolved items need an owner before production release.
Keep one unit system as the controlling manufacturing reference. If you show both inches and millimeters, state which takes precedence and how secondary values are rounded. One inch is exactly 25.4 mm, as defined in NIST’s length-unit guidance. For example, 13 inches equals 330.2 mm; rounding it to 330 mm changes the stated size, even though the difference may be acceptable for a particular agreed tolerance.
This sheet covers dimensions and fit. For the wider order record, use the fabric storage bin retail specification sheet, which also covers labels, workmanship, packaging and acceptance responsibilities.
Frequently asked questions
Are 11-inch and 13-inch fabric bins standard sizes?
Treat those descriptions as size labels until the listing defines width, depth and height. They do not establish a universal shelf fit. Compare the completed product’s stated dimensions with the actual compartment and confirm whether handles and lids are included.
How much smaller should a fabric bin be than its shelf opening?
Allow enough space for insertion, removal and the intended use, then account for the maximum permitted outside size. Agree on clearance with the supplier and confirm it on a sample. A fixed deduction cannot cover every lid, handle, shelf or fabric construction.
Can I rotate a bin to make it fit?
Check the rotated orientation as a separate arrangement. Width and depth change places, but the handle may end up against a wall and the lid may open in an unsuitable direction. Confirm access and support in the orientation you intend to show customers.
Can a soft bin be slightly larger than the shelf because it compresses?
If fit depends on compression, specify that condition and evaluate it with the intended contents and repeated handling. Squeezing an empty sample into place does not establish convenient everyday use or compatibility with a rigid base insert.
Will a change to board thickness require a new size check?
Review the affected dimensions. A panel change can alter the interior, folding and assembled shape, depending on how the panels are fitted. Compare the revised assembly with the approved drawing and shelf-fit requirements before accepting the change.
What should appear on the retail size diagram?
Show the assembled outside width, depth and height with a clear front view or perspective. State whether the lid and handles are included. If you also show folded or packed dimensions, label them separately so customers can identify the size used for shelf fit.
Send a shelf-fit brief with your product inquiry
Prepare the shelf measurements, photos of any obstructions, intended contents and the proposed set layout. Add the completed dimension sheet and identify requirements that are still open. Great Shine’s custom storage boxes and fabric bins page provides product formats to discuss, including collapsible and lidded constructions. Confirm the dimensions for the selected design through its drawing and sample.