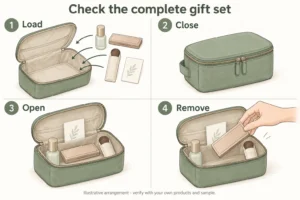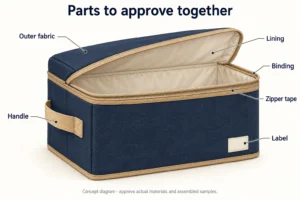
A lunch bag is the right size when the intended meal containers, cold packs and drink fit together, pass through the opening, and allow the bag to close without pressure on the contents. Retail buyers should check that complete load in a finished sample before approving dimensions for production.
This lunch bag size guide includes a worked layout example and a sample inspection sheet. The example uses hypothetical dimensions to show the calculation. It does not report a Great Shine product test or confirm compatibility with any container brand.
Quick answer: what should you measure first?
Measure the closed lunch container, the cold packs in their intended condition, and the bottle with its cap attached. Arrange them as they will travel. Then compare that arrangement with the bag’s usable internal dimensions and clear opening. Finish with a physical trial that checks closure, removal and carrying.
For a retail range, keep the container model and sample revision in the record. A claim such as “fits our lunch box” needs an identifiable lunch box and a repeatable packing arrangement.
Measure the complete meal load
Start with the objects the customer will actually pack. A container’s food capacity, such as its volume in millilitres, does not give its outside dimensions. Clips, handles and raised lids can extend beyond the main body.
Use one measurement convention throughout the specification: width from left to right, depth from front to back, and height with the bag standing upright. Mark the orientation on a photo so the supplier does not interpret width and depth differently.
Record the following before choosing a bag size:
- The closed meal container’s widest points, including clips and lid edges.
- The quantity, shape and thickness of the cold packs in the condition used for the trial.
- Bottle diameter and total height, including its cap or carrying loop.
- Any separate snack box, cutlery case or other item that must travel in the bag.
- Which items must stay upright and which may be stacked.
Cold packs need space in the planned load. For perishable lunches, USDA advises using at least two cold sources and describes placing them above and below the food. Its guidance on keeping bag lunches safe explains the food safety considerations. A size trial checks whether that arrangement fits; it does not establish how long food will remain cold.
Separate outside dimensions from usable space
The assembled outside size describes the bag’s overall footprint. Usable internal dimensions describe the space available after the lining, insulation, seams and internal fittings are in place. Both belong in the specification.
Measure the finished interior without stretching the fabric or compressing the padding. Check the base, the space around the widest part of the container and the area below the closed lid. A tapered bag may have enough width near its top but too little at the bottom.
The opening needs a separate check. The length of a zipper is not the clear width of the opening it creates. Curved corners, zipper ends and the way the lid folds back can restrict the path of a rigid lunch box.
For each sample, distinguish these measurements:
- Assembled outside dimensions: the body size in its normal upright shape, with any handle or pocket projection recorded separately.
- Usable inside dimensions: clear space at the positions occupied by the planned load.
- Clear opening: the space available to insert and remove the closed container through the fully opened bag.
- Packed or folded dimensions: the size in the agreed retail packaging, which is a different measurement from usable capacity.
Do not calculate an internal size by subtracting a nominal insulation thickness from the outside size alone. Seams, binding, corners and construction also affect the finished space. Ask for measurements from the completed sample.
Worked example: a lunch box, two cold packs and a bottle
The following dimensions are hypothetical. They illustrate a preliminary layout check, not an approved product size. All measurements use centimetres; multiply inches by 2.54 if your source measurements use inches.
Assume the load contains:
- One closed meal container: 20 cm wide × 14 cm deep × 7 cm high.
- Two flat cold packs: each 20 × 14 × 1.5 cm.
- One upright bottle: 7 cm diameter × 22 cm high, with no projection beyond that envelope.
Place one cold pack below the container and one above it. This stack measures 20 × 14 × 10 cm because its height is 1.5 + 7 + 1.5 cm. Put the bottle beside the stack, along the width of the bag.
That arrangement needs a rectangular envelope of 27 cm wide × 14 cm deep × 22 cm high before clearance. The width is 20 + 7 cm; the bottle determines the height. This calculation assumes that the objects retain the stated shapes and that no divider sits between them.
Preliminary fit comparison
The table compares this exact arrangement with hypothetical clear internal spaces. It does not assess other orientations or confirm physical fit.
| Hypothetical inside space, W × D × H | Dimension check for this load | Decision before sampling |
|---|---|---|
| 25 × 16 × 23 cm | Width is 2 cm short for the specified side-by-side arrangement. | Revise the layout or bag width. This arrangement fails the dimensional screen. |
| 29 × 16 × 23 cm | Nominal spare space is 2 cm in width, 2 cm in depth and 1 cm in height. | Proceed to a physical trial. Opening shape, taper and closure remain unverified. |
| 29 × 16 × 21 cm | Height is 1 cm short for the specified upright bottle. | Revise the bottle position or bag height. Do not assume the lid can stretch around it. |
The spare space in the second row is the total difference in each dimension, not an allowance on each side. It is also not a recommended universal clearance. A soft lining, stiff zipper edge or rounded corner may still prevent easy use.
If the bottle moves to an outside pocket, repeat the check with the main compartment loaded. A pocket can press inward, and a bottle that fits the pocket diameter may still sit too high or pull the bag off balance. Record that as a different packing arrangement.
Run the sample trial in a fixed order
Use a finished sample with the intended lining, insulation, base and closure. A shape mock-up can help decide a layout, but changes to the construction can change the fit.
1. Identify the sample and the contents
Give the bag a sample reference and revision number. Record the container model, cold pack references and bottle model. Photograph them beside a ruler before packing, including any protruding clips or caps.
For an early shape check, rigid blocks with the measured dimensions can reveal obvious conflicts. Use the actual objects for final approval: a block does not reproduce a lid clip, rounded base or bottle grip.
2. Check insertion and removal
Open the bag fully and insert the closed container in the required orientation. Note whether it catches on the zipper ends or must tilt to pass through. If the intended use requires the lunch box to remain level, tilting it is a failed requirement even when it eventually fits inside.
Repeat removal with the other items still in place. There should be enough access for the user to grip the container. If a bottle or upper cold pack has to come out first, record that sequence and decide whether it suits the product’s intended use.
3. Pack the full arrangement and close the bag
Put every required item in its agreed position. Close the bag normally without pressing on the container lid, squeezing out a cold pack or pulling the sides together by force.
Inspect the zipper path, lid corners and bottle cap area. Note bulging, a lifted base or a liner pulled into the closure. Take a photo of the closed bag from the front and side so the approved appearance is visible.
For a drawstring design, check the opening that remains after closure and whether the contents stay contained during normal handling. Its closure should be assessed on its own design requirements rather than against a zipper specification.
4. Check handling with the intended load
Record the complete loaded weight, including the bag. Lift it using the intended handles or strap and check balance, access to the handles, and contact between the contents and the user’s hand.
This handling check does not establish a rated load or long-term seam strength. Agree any separate strength or durability test with the supplier. Keep those results distinct from the fit approval.
Copyable lunch bag fit and approval sheet
Copy this sheet into your sample review document. Fill in the result column during inspection and attach the referenced photos. The entry spaces are intentionally blank; no sample has been tested in this article.
Use Pass, Revise or Not checked for the final decision on each requirement. Agree the acceptance conditions before testing, including whether the container must remain level and whether the bottle must stay upright.
| Record or check | What to enter or observe | Result / evidence |
|---|---|---|
| Bag reference | Model, sample revision, inspection date and reviewer | ____________________ |
| Complete load | Item references, quantities and measured outside dimensions; attach a list if needed | ____________________ |
| Packing arrangement | Position and orientation of each item; photo reference | ____________________ |
| Finished dimensions | Outside W × D × H and usable inside measurements at the occupied positions | ____________________ |
| Opening and insertion | Clear opening; whether the closed container enters in the agreed orientation | ____________________ |
| Full-load closure | Whether the closure operates normally without pressing on contents; front and side photos | ____________________ |
| Removal and access | Whether the user can grip and remove the container; any items removed first | ____________________ |
| Bottle and pocket | Upright clearance, retention and any intrusion into the main compartment | ____________________ |
| Loaded handling | Total weight, handle access and balance observations; separate from strength testing | ____________________ |
| Decision and revision | Pass / Revise / Not checked; required change, responsible person and retest reference | ____________________ |
Save a simple set of evidence photos with the sheet: the measured contents, the fully loaded open bag, the closed bag and the container being removed. Use the same sample reference in the filenames. A single empty-bag photo cannot document the approved load.
Match the revision to the point of failure
When a sample fails, identify where it fails before changing its overall size. A wider body will not necessarily solve a restricted opening, and a taller body may not solve a lid that slopes across the bottle cap.
If the container catches during insertion but sits comfortably once inside, review the opening shape and zipper end positions. If it enters easily but cannot sit flat, check the usable base and corner shape. When closure is the problem, inspect the height of the packed stack and any space occupied by the lid lining or pocket.
For a fit that depends on compressing the insulation, revise the specification and retest without that pressure. Do not approve forced closure as the normal packing method.
Record each proposed change on the sample sheet. A change to the lining, insulation, divider, pocket or zipper position can affect several checks at once. Repeat the complete load trial after the revised sample arrives, even if the requested change was small.
Turn the approved sample into a usable specification
Keep the approved bag, packing list and completed fit sheet under the same revision reference. Include both external manufacturing dimensions and the usable space needed for the specified contents.
Agree dimension tolerances and a measurement method with the supplier. A sample that fits only at the largest allowed finished size may leave smaller units unable to take the same load. Discuss how the proposed tolerance will be checked against the required fit before approving production.
The product listing should describe only the compatibility you can support. If the sample was checked with one named container and two particular cold packs, preserve those limits in the claim. A change to the container lid or bottle cap may require another check even when its advertised capacity stays the same.
To discuss a custom size, review Great Shine’s custom insulated lunch bag options and send the intended packing list with your dimensional requirements. Include the sample checks above so the quotation and sample review use the same definition of fit.
Frequently asked questions
Does a larger litre rating mean my lunch box will fit?
Not necessarily. Volume does not describe the shape of the base or the opening. A tall, narrow bag and a short, wide bag can have similar stated capacities but accept different rigid containers. Compare the container’s outside measurements with usable space and test insertion.
Should I add a fixed allowance to every lunch box dimension?
There is no single allowance that confirms fit for every construction. Required clearance depends on the opening, padding, seams, container projections and how the user grips the box. Use added space as a design proposal, then confirm it in a finished sample.
Can one trial cover every colour or version of a lunch bag?
Check whether the versions share the same pattern, materials, padding, closure and pockets. If those features change, repeat the affected checks. Keep the approved configuration explicit rather than assuming that a shared product name means identical internal space.
Can I approve the fit from supplier photos?
Photos help when they identify the exact bag, measured contents and closed arrangement. Ask for a short video showing insertion, normal closure and removal if the opening is a concern. A buyer who needs to judge handling or grip should inspect the physical sample before approval.
Does passing the fit check prove the bag keeps food cold?
No. A fit check confirms the specified load can be packed and handled as agreed. Thermal performance needs a separate test with stated contents, cold sources, starting conditions, duration and surrounding temperature. Keep fit approval and temperature results in separate records.