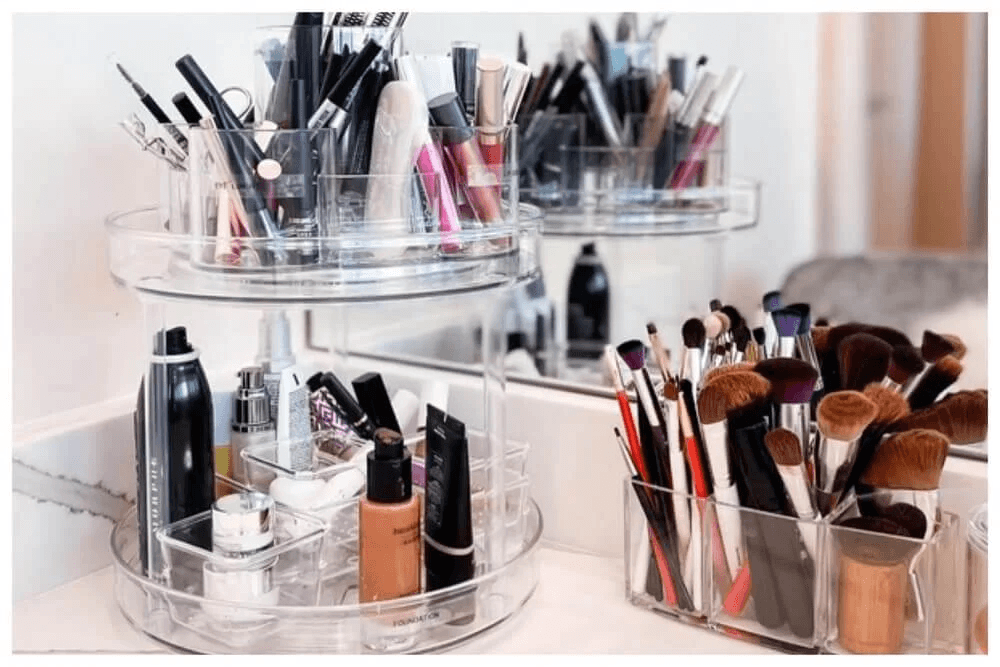
A makeup organizer holds cosmetics and tools in compartments, drawers or pouches so you can find and return each item. A vanity organizer stays on a counter or inside a drawer. A portable organizer also needs to keep the kit contained while you carry it.
For professional use, compare the layout with the products used on a job: adjustable dividers, visible contents, separate brush storage, accessible cleaning surfaces and a secure closure can each solve a different problem. Check those features with a loaded sample before choosing a design.
Choose a format for the place you work
A countertop tray or drawer unit suits cosmetics that stay in one place. Check the height of the bottles, clearance above the unit and room to open each drawer. A rotating unit also needs clear space around its full turning path.
A divided case or closed makeup bag suits a kit that travels. It needs an opening wide enough to retrieve palettes, compartments that hold their position and a way to contain small items when closed. A tall open brush cup may work on a table but need a separate cover or pouch during transport.
For a working kit, decide whether the organizer carries a small selection for touch-ups or the full assortment for a job. The same exterior size can give very different usable capacity once padding, partitions and pockets are added.


Professional makeup organizer features to check
- Place the largest palette and tallest closed bottle first, then arrange smaller compartments around them. Check that removable dividers stay attached when you take an item out.
- Clear panels, shallow trays or labeled pouches help identify contents. Try retrieving a frequently used product without unloading the layer above it.
- Check brush length with the cover closed. Give clean and used tools separate places; a compartment alone does not clean its contents.
- Inspect corners, seams and the space beneath removable inserts. Confirm which cleaning methods the complete construction permits.
- Put the loaded organizer on the intended work surface. Check whether it stays stable and whether the open lid blocks access or tips it backward.
- Close the kit and inspect bottle caps, brush bristles and the zipper path for pressure or trapped items. Confirm the carrying limit for that model.
How those features look in a Great Shine makeup bag
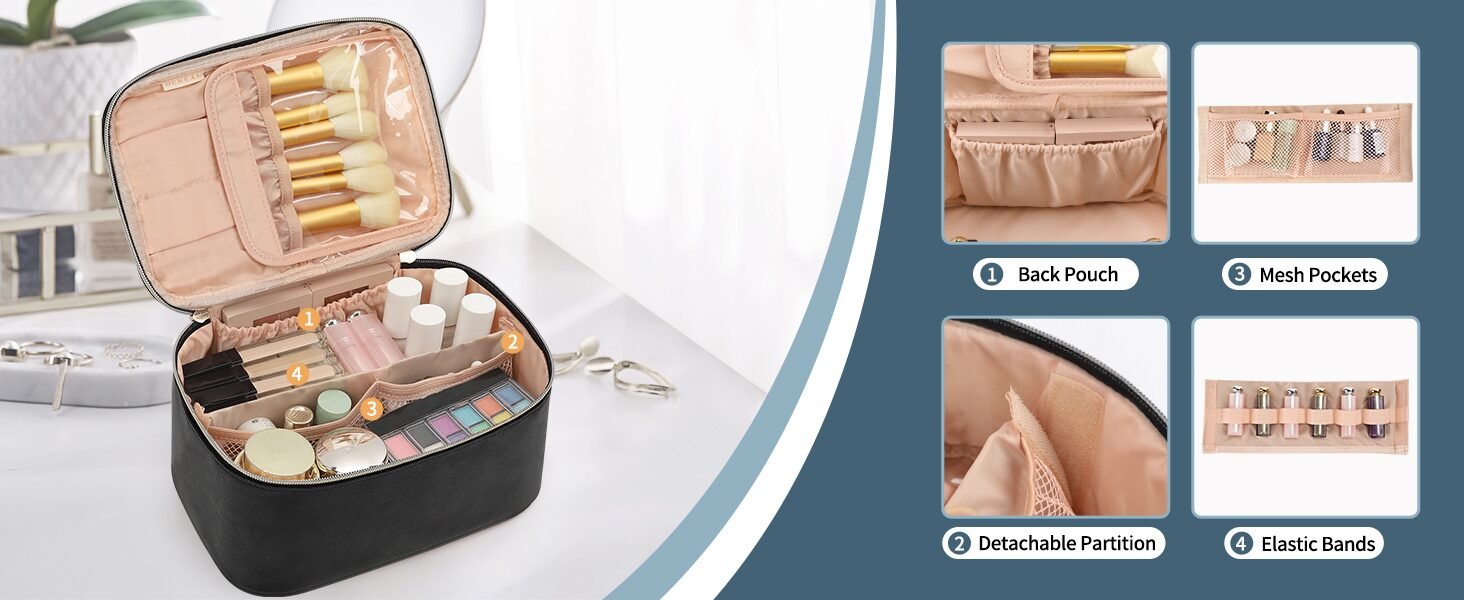
The corresponding configuration lists outside dimensions of 25.5 × 21.48 × 24.99 cm, quilted pongee and PVC, printed branding, and PP-bag plus color-box packaging. Confirm the dimension orientation on the sample. Lining, partitions and the occupied brush section affect the space left for products.
| Visible structure | Use and sample check |
|---|---|
| Removable partition | Separates groups of bottles and palettes. Try the layout with your widest palette, then check that the partition stays in position during retrieval. |
| Brush area with clear flap | Gives brushes a separate place in the lid. Close the filled bag and inspect whether the flap or contents press on the bristles. |
| Mesh pockets | Keep small items visible. Check pocket depth and whether you can remove an item without pulling out its neighbors. |
| Elastic holders | Provide individual positions for narrow items. Try the intended diameters to check grip and removal effort. |
| Rear pouch | Provides a separate position for flat items. Check their edges and height against the lid and closure path. |
Choose the layout from your contents list. Place the tallest closed bottle and widest palette first, then arrange brushes and smaller items around them. Moving the partition may make room for a palette while reducing space for bottles, so review the entire kit after each change.
More pockets do not automatically make a bag more useful. A pocket that hides a frequently used item or crowds the zipper can slow access. Record where each item belongs and photograph the loaded layout before approving it.
Load the pockets as well as the main compartment before judging available space. A filled mesh pocket can project into the area reserved for a palette, while a full rear pouch can narrow the opening. Photograph the layout from above and from the side so a revision identifies the interference, not just a request for more capacity.
For a brand comparing versions, keep the same bottles, brush sleeves and palettes in each sample. Record any change to the partition position or pocket depth. This makes a layout change easier to evaluate than comparing two photographs with different contents.

Check bottle movement and spill containment separately
A fitted compartment can limit movement, but it cannot guarantee that a bottle will not leak. Check the container’s cap or pump lock and decide whether liquids need a separate removable pouch. Keep fragile palettes away from hard bottle corners.
Water-resistant fabric does not establish that the whole organizer is leakproof. Seams, zippers and lining joints need separate evaluation before making a containment claim.
Measure usable compartments, not just the outside
List the closed bottle heights, palette widths and brush lengths, including caps and protective sleeves. For a portable kit, record whether each item will stand upright or lie flat.
Compare those measurements with the usable interior after the lining and dividers are installed. Check the opening too: an item can fit inside the main compartment yet be awkward to pass through its zipper opening.
Our makeup bag size guide explains how to turn the contents into a sizing brief. Finish with a loaded sample check; outside dimensions alone do not establish fit.
Compare materials through cleaning and handling
A rigid clear organizer lets you see products and can stand independently on a vanity. Inspect drawer runners, exposed edges and removable trays. Confirm a suitable cleaner before using alcohol or another solvent on plastic.
For a fabric case, examine the lining as closely as the exterior. Powder can collect at seams, and removable parts may make some areas easier to reach. Follow care instructions for the whole construction, including support boards. A clear panel’s visibility does not establish scratch resistance or compatibility with a particular cleaner.
Use the same loaded sample check for each design
For a beauty brand or retailer comparing samples, keep the load consistent. The sequence below is a suggested review method, not a report of a completed Great Shine test.
- Record the model and revision, then photograph the exact products that need to fit.
- Place the largest items first. Record remaining space and any item that requires an awkward angle or forced fit.
- Open the organizer on the intended work surface. Remove and replace frequently used products, including those behind pockets or beneath trays.
- Close the filled organizer and inspect its lid, corners and zipper path. Handle a portable design as its instructions permit, then reopen it to check for movement.
- Inspect cleaning access. Record which parts come out, how they reattach and which care instructions apply.
Send annotated photos and unresolved points with the sample revision request. Approve capacity and carrying claims only when the supporting checks cover that configuration.
For a portable beauty range, compare our custom cosmetic and makeup bags. Send your item list, required layout and branding requirements so we can discuss the sample and packaging for your project.


