How to Organize an Underwear Drawer That Stays Easy to Use
To organize an underwear drawer, empty it, group the clothes you wear, and measure the usable space before adding containers. Fold soft items to suit the drawer height, give shaped bras room to keep their form, and place daily choices where you can reach them. Use dividers where categories drift together, then test the arrangement after putting away a full load of laundry.
Quick answer: Start with a separate area for each useful category, such as everyday underwear, socks, and bras. Keep the divisions broad enough that putting clothes away feels straightforward. You should be able to see what is available, take out one item without disturbing its neighbors, and close the drawer without pushing clothing down.、
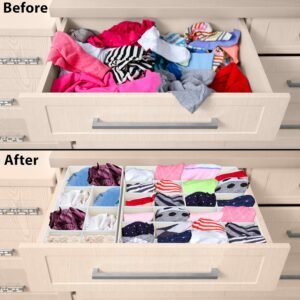
Step 1: Empty the drawer and decide what belongs there
Empty the drawer onto a clean, dry surface near the dresser. You may find a rarely worn garment beneath the daily supply or discover that a large box is holding only a few small items.
Keep anything that needs washing out of the clean pile. Return receipts, loose accessories, and packaging to their appropriate places.
You do not need to empty the entire dresser at once. Finish one drawer before opening another if spreading out more clothing would make the task difficult to complete.
Make decisions by use and condition
Start with the items you currently wear and want to keep accessible. Separate anything that no longer fits comfortably, has damaged fastenings, or needs a decision before returning to daily use.
Group pieces used only with particular outfits in an occasional section, where you can find them without sorting through them every morning.
Give uncertain items a clear next step. A bra needing a fit check or a garment awaiting repair should not keep returning to the everyday section by default. Put it somewhere identifiable until you can make that decision.
There is no universal number of pairs you must keep. Your wash schedule, available space, clothing preferences, and spare supply all affect what makes sense.
Include the clothes currently in the laundry
An almost empty drawer can look spacious just before wash day. If you plan its layout using only what remains inside, the clean clothes may have nowhere to go when they return.
Account for the items being worn, washed, or dried. You do not have to wait for every garment, but leave room for the ordinary supply that belongs in each category.
This is especially useful when several people share a dresser. A section that appears unused may belong to someone whose clothes are in the wash.
Separate ownership before separating styles
For a shared drawer, first decide which area belongs to each person. Then divide those areas into categories only where that would help.
Sorting everyone’s socks together because they look similar can create extra work later. A simple left-and-right division may be more useful than several small boxes organized by color.
Use labels if ownership or purpose would otherwise be unclear. Choose words the people using the drawer understand, and place labels where they remain visible once clothes are inside.
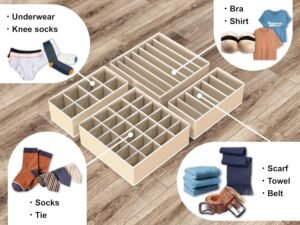
Step 2: Clean and measure the usable drawer space
Clean the empty drawer according to the furniture manufacturer’s instructions and let it dry before returning clothes. Then measure the interior width, depth, and usable height, including anything that limits the opening.
Use the inside measurements when comparing containers. The decorative drawer front can extend beyond the space available for storage.
Measure the inside footprint
Measure from one inside wall to the other, then from the inside front to the back. Notice rounded corners, fittings, or changes in shape that could interfere with a rectangular organizer.
Write the measurements down in the units used by the products you are comparing. Keeping one consistent unit avoids confusing a container’s size with the size of its packaging.
You can cut paper to an organizer’s stated footprint and lay it inside the drawer. This is a useful first check for arranging several containers, although it does not test their height or how flexible sides behave when filled.
Check height with the drawer closing
The top of a drawer’s side wall is not always the highest point clothes can reach without catching. A rail, drawer above, or internal fitting may reduce the usable clearance.
Place one folded garment or a suitable empty container inside and close the drawer slowly. Stop if it catches; do not use the drawer front to compress the contents into place.
Repeat the check once the organizer is filled. Soft boxes can bulge, and a folded waistband or bra strap can sit higher than it did during the empty test.
Notice how far the drawer opens
Some drawers expose their whole interior, while others leave the back partly beneath the dresser. That changes which areas are convenient to reach.
Keep everyday choices within the visible opening. Use the back for items needed less often, provided you can still retrieve them without pulling out other contents or forcing the drawer beyond its intended travel.
A long row of folded underwear running front to back may be difficult to use if the back stays hidden. Two shorter groups or containers that can be lifted out may suit that drawer better.
Distinguish outside size from usable compartment size
An underwear drawer organizer has its own walls, seams, and partitions. Its outside width can fit the drawer while individual cells are too small for your folded clothes.
Compare a real folded garment with the usable cell dimensions where those are available. A cell shown holding a small brief may not accommodate longer boxer briefs without several extra folds.
You also need enough room to put a hand around the item. A garment that can be squeezed into a compartment is not necessarily easy to remove from it.
Step 3: Create categories that match how you get dressed
Group clothes according to the choices you make when dressing. Everyday underwear, sports pieces, socks, and occasional items may be useful categories; color can be a secondary distinction if you need it.
If you hesitate over where a garment belongs, change the categories. For example, one sports section may be easier to restock than separate sections for several activities.
Put frequent choices within reach
Keep your everyday supply near the front or in the area you can reach most comfortably. Someone who chooses underwear and socks together may want those sections beside each other.
A piece used only with a particular outfit can sit farther back. It should still have an identifiable place, so you do not need to search the entire drawer when that occasion comes.
Avoid moving every item to a distant section solely to make the front look symmetrical. The arrangement needs to work while you are getting dressed, including when you are in a hurry.
Use broad categories before creating small subdivisions
Begin with a few divisions and add more only when you repeatedly need them. If you easily distinguish two underwear styles by sight, they may be able to share one row.
A separate compartment can help when small items disappear into a larger pile. It can also be useful when two groups have similar colors but different purposes, such as everyday socks and a particular sports pair.
Too many sections can leave narrow gaps while one category overflows. Check whether each boundary makes finding or returning an item easier.
Leave enough space for the largest group
Categories do not need equal areas. If most of your drawer holds underwear and only a few pieces of hosiery, give underwear most of the usable space.
Lay out the groups before choosing containers. A broad tray for the largest group and a small box for the remainder may fit better than a matching set of equal sections.
As your clothing changes, the boundaries can move. A layout that depends on a fixed number of identical items may be harder to maintain than one with flexible sections.
Keep clean storage separate from laundry collection
Return clean, fully dry items to the drawer. Put clothing awaiting washing in its usual laundry collection area, so you do not have to remember which part of a drawer contains which condition.
If your routine includes setting aside a garment for another wear, give that a separate, clearly understood place appropriate to the garment. Avoid mixing it into the supply you identify as freshly washed.
The drawer layout should make these distinctions obvious to anyone who puts clothes away. A hidden rule known only to one person is difficult to maintain in a shared home.
Step 4: How to fold underwear to fit your drawer
Choose a fold that leaves the item visible and easy to return. A flat rectangle, a short upright row, or a loose roll can each work; the best choice depends on the garment and the drawer’s available height.
Try a method on a few pieces before folding the whole collection. Check the result in the actual drawer, including whether the items remain accessible when one is removed.
How to fold briefs into a compact rectangle
Lay a clean, dry pair flat with the front facing up. Smooth it gently with your hands without pulling the elastic taut.
- Bring the crotch upward toward the waistband to shorten the garment.
- Fold one side inward, then the other, to create a rectangle that suits your chosen section.
- If the rectangle is still too long, fold it once more without forcing a thick bundle.
- Place it in the drawer with an edge or waistband you can recognize facing upward or toward you.
The exact overlap will vary with the cut and size. Adjust the fold so the garment sits comfortably; do not try to make every style match a rigid display size.
For a shallow drawer, a broad, flat fold may be easier than an upright one. Keep a stack short enough to see and remove the pieces without lifting a large pile.
How to fold boxers and boxer briefs
Lay the garment flat and bring the legs together to form a narrower shape. Tuck in any protruding fabric gently so it does not catch on neighboring items.
Fold upward from the leg openings toward the waistband, using another loose fold if the length requires it. Compare the resulting height with the drawer clearance before choosing its final orientation.
Longer legs and thicker waistbands create a bulkier bundle. Give them a wider row or larger compartment instead of repeatedly compressing them into cells intended for smaller pieces.
For loose boxers, a flatter rectangle may hold its shape more predictably than a tight roll. If the fabric collapses when stood upright, support a short group in a suitable bin or lay the pieces in a shallow overlapping row.
How to arrange folded underwear vertically
Place folded pieces beside one another like files, with the recognizable edges visible from above. This makes it possible to select a pair without lifting a stack.
The row needs enough support to stay together and enough room to release one item. If the whole row falls sideways after every removal, shorten it with a divider or use a smaller container.
You do not need to pack the row tightly to keep it upright. A divider at the end can support the remaining garments as the number of clean pieces decreases.
Slippery, very small, or loosely shaped items may not stand independently. Use a shallow compartment for those pieces rather than repeatedly refolding them into a shape they will not hold.
When rolling is convenient
A loose roll can suit a narrow compartment when the garment’s construction allows it. Fold the sides inward first if needed, then roll without stretching the fabric or pulling the waistband over a thick bundle.
Test how easily the roll comes out and returns to its place. A compact shape offers little benefit if the method takes more effort than you will spend after laundry day.
Rolling does not guarantee that every drawer will hold more. Its usefulness comes from the shape it creates relative to the available space and the way you prefer to handle the clothes.
When a simple grouped bin is enough
You may prefer to place small briefs loosely in a shallow box. That can be a workable option when the group stays small enough to search at a glance.
Separate styles or ownership if necessary, and keep the contents below the rim. If choosing an item requires digging through several layers, reduce the pile or divide it into more useful groups.
If you prefer this loose-bin approach, test it through a laundry cycle before adding more divisions.
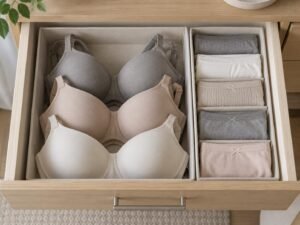
Step 5: How to organize bras and underwear together
Arrange bras according to their shape. Molded cups need a different approach from an unstructured bralette, and neither should be forced into a compartment that distorts it.
Place the largest shaped pieces first when planning a shared underwear drawer. Their dimensions leave you less flexibility than a group of small folded briefs.
Keep shaped cups in their natural form
Lay molded bras with both cups supported in their normal shape. Position compatible bras behind one another where they fit without pressure, leaving the cups uncrushed.
ThirdLove recommends storing bras with their cups nested between separate bras and avoiding folding or crumpling them. This does not mean turning one cup inside out into the other cup of the same bra. ThirdLove’s bra storage guidance
Check the instructions for your own garment, especially if it has unusual structure or padding. Different shapes may not nest neatly together, so place them beside each other when overlapping would force the cups out of form.
Keep straps and fastenings contained
Arrange straps within the space assigned to the bra so they do not trail into the drawer runners or another compartment. Keep hooks from catching on adjacent lace or mesh.
You can give delicate pieces a separate smooth-sided section when there is room. Avoid placing loose jewelry or other snagging objects among them.
The drawer should close with the bras resting as arranged. If closing it presses on the cups, move them to a deeper suitable space or reduce what is stored above and around them.
Fold unstructured pieces only as their design allows
A soft bralette without shaped cups may fit as a loose flat fold. Keep straps with the garment and avoid folding a rigid fitting into a pressure point.
Check your sports bras individually. Shaped or removable cups need room to retain their form, while an unstructured style may lie flat.
Try the folded garment in its intended section before assigning a whole row. If it springs open or forms a thick mound, a broad compartment may work better than a narrow cell.
Store matching sets without hiding the smaller piece
If you usually select a bra and underwear together, keeping the pieces in adjacent sections can make that choice easier. A small nearby compartment can hold matching bottoms without covering the bra cups.
You can also group by set when the garments fit comfortably and remain identifiable. Avoid wrapping elastic around a bra to hold the pieces together.
Keep pieces you wear independently in their usual categories. A matching color does not require them to share a compartment.
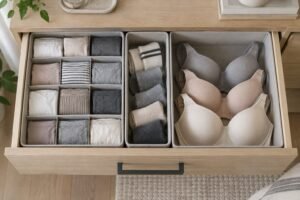
Step 6: Keep socks, hosiery, and shapewear identifiable
Give these items their own areas when they share the underwear drawer. They can be small enough to disappear among briefs or bulky enough to disrupt a row planned for lighter garments.
Keep only the categories you use in this drawer. If socks already have a convenient home elsewhere, there is no need to move them merely to copy a particular layout.
Pair socks before putting them away
Lay matching socks together and fold the pair into a shape that fits its section. For longer socks, bring the length into a loose rectangle without pulling one cuff tightly over the whole bundle.
Group pairs by the distinction that matters when dressing, such as everyday, sports, or thicker seasonal socks. Similar-looking pairs can be kept in a short row with their recognizable details visible.
Set unmatched socks aside in a small, separate location while checking the rest of the laundry. Letting them spread through the paired section makes the drawer harder to use and can hide pairs you already have.
When the missing item returns, reunite the pair before restocking. If an unmatched collection keeps growing, review it during your next laundry sort instead of assigning it more of the daily drawer.
Give hosiery a smooth section
Keep tights and other fine hosiery away from rough divider edges and exposed fastenings. Fold them loosely into a smooth-sided section or a suitable small pouch, following any garment-specific instructions.
Distinguish similar colors or styles with a label if you cannot identify them once folded. A simple note on the container may save unfolding several pieces to find the one needed.
Choose a pouch only if opening it helps keep the group manageable. Individual packaging for every item can add unnecessary handling when a single shallow section would work.
Allow room for structured shapewear
Shapewear may contain panels, seams, or other construction that makes a tiny folded bundle unsuitable. Let the garment’s shape guide the space it receives.
Fold along convenient areas only when the design permits it, and avoid forcing a rigid part into a sharp bend. A longer section may work better than a small underwear cell.
Keep bulky pieces from covering everyday briefs. If the drawer cannot accommodate both without pressure, store the larger pieces in a separate appropriate area and keep that location easy to remember.
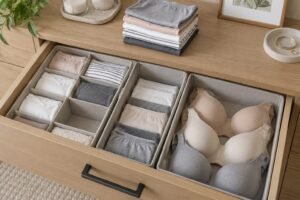
Step 7: Add organizers where they solve a specific problem
Use drawer dividers for underwear when rows collapse or categories mix. Choose small boxes when you need to lift out a group, and leave open space where a shaped garment needs flexibility.
You can combine these approaches within one drawer. Covering every square inch with identical compartments is unnecessary if different clothing shapes need different amounts of room.
Broad bins for flexible categories
A shallow open bin can hold a group of briefs, bralettes, or socks without assigning one cell to every piece. It is useful when the number of items changes throughout the week.
Check that the sides stand as intended when partly filled. Some soft bins depend on an inserted base or another assembly step to hold their shape.
A bin you can remove easily also lets you reach a group near the back. Make sure its filled height and width still allow removal without dragging adjacent garments out with it.
Individual cells for small, consistent items
Grid organizers can help keep similar small pieces separate. They work best when the cell shape suits how you fold the items and you can reach each one comfortably.
The cell count alone says little about usefulness. A box with many narrow slots may be less suitable for your clothes than one with fewer broad sections.
Try your largest representative item in a cell before committing the whole category to that format. If it requires a tight tuck or rises above the organizer, use a larger section.
Adjustable dividers for changing groups
Adjustable dividers can separate broad rows without adding a container around every category. Check their adjustment range against the inside of the drawer and follow the installation instructions.
The divider’s ends should contact the surfaces the product is designed to use. Do not overtighten a tension divider to compensate for an unsuitable fit, especially against a thin or flexible drawer wall.
Look at the height as well as the length. A panel that fits between the walls may still interfere with closing the drawer or with reaching over it.
Material names do not replace care instructions
Fabric organizers can feel soft at the edges, but seams, support panels, and fasteners still deserve inspection. Plastic or bamboo products also need smooth surfaces where they contact delicate clothing.
Do not assume that every fabric box is washable. For example, IKEA’s SKUBB six-box set specifies cleaning by vacuuming or using a lint roller and says not to wash the boxes. Those instructions apply to that product, but illustrate why the care label matters. IKEA SKUBB materials and care
Choose the actual construction and care method you can use at home. A label such as mesh, non-woven, or bamboo does not by itself establish washability, durability, or environmental benefits.
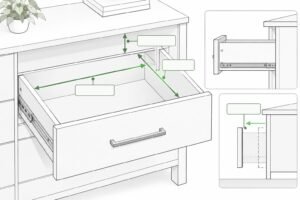
Step 8: Test your underwear drawer layout
Arrange the clothing groups first, then adjust the boundaries around them. Open and close the drawer and remove several different items before deciding that the layout is finished.
The following examples show ways to plan space. They are illustrative arrangements, not measured capacity claims or layouts that will fit every dresser.
A shallow drawer with underwear and socks
Place underwear in short, low rows across the visible part of the drawer. Give socks a separate shallow section beside them, and use a small area at the back for occasional compact pieces.
If folded items stand above the available clearance, lay them flatter. A short overlapping arrangement can still show the edges without requiring the upright height of a file fold.
Check whether you can identify an item in the middle of each group. If only the top pair is visible, reduce the stack height or spread the group into a second row.
Avoid adding a tall box because its footprint happens to fit. A lower divider or a shallow existing container may solve the same problem with less wasted height.
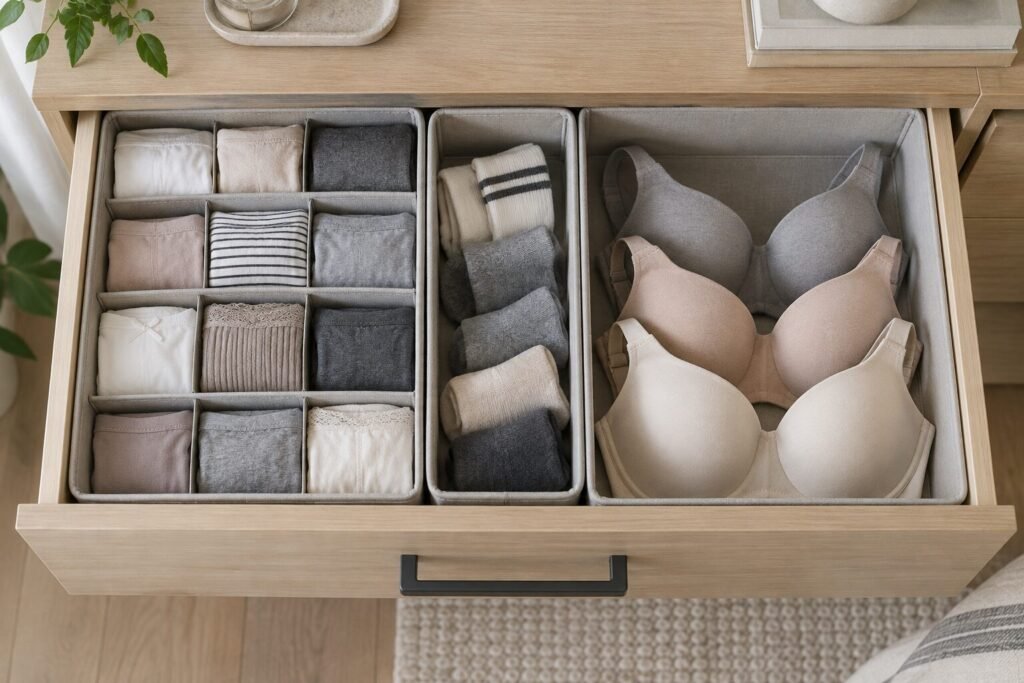
A wide drawer that also holds bras
Place the shaped bras in a broad area where their cups fit without being flattened. Arrange smaller underwear sections beside that area, with socks or bralettes in the remaining suitable space.
Start by testing the largest bra, not by dividing the drawer into equal thirds. Once that section works, place a divider where it prevents smaller items from moving into the cup area.
Keep underwear you use frequently within reach even if the bra section occupies most of the width. A layout with bras toward one side may give better access than putting all small items behind them.
Remove a bra from the middle of the group as part of the trial. If you have to lift every other item or drag a strap through a neighboring section, adjust the spacing before filling the drawer completely.
A deep drawer with a hidden back section
Keep everyday items in the top, reachable layer. Before adding anything underneath, decide how you will reach it when the drawer is full.
A removable tray can create an additional layer if the drawer and tray are designed for it and the arrangement remains stable. Keep less frequently used items underneath and confirm that you can lift the tray without spilling its contents.
You can also leave some vertical space unused. Filling the drawer to its full height is unnecessary when that would create several layers you must unpack every morning.
At the back, use a removable group for occasional items if it remains accessible. Avoid creating a storage area that requires unsafe drawer removal or reaching into the furniture mechanism.
A shared drawer
Assign each person a clear area, then fit their categories within it. One person’s section may need more room for bulky pieces, while another can use smaller bins.
Agree on the layout with the people who will use it. A system understood by the person doing the organizing but not by the person putting laundry away will soon need sorting again.
With matching containers, add an ownership label near the front where clothes will not cover it.
If one shared drawer cannot hold everyone’s normal supply comfortably, redistribute categories across available storage. Repeatedly pressing clothes into an overcrowded space will not make the arrangement easier to maintain.
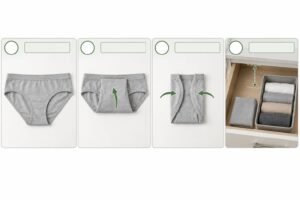
Step 9: Check the arrangement after laundry day
Restock the drawer with the normal clean supply before judging its capacity. A layout that works when half the clothes are in the wash may fail when everything returns.
Fold items using the method assigned to their section and put them straight into place. If doing so takes too much effort, simplify the system while the problem is clear.
Test removal as well as restocking
Take out one item from the front, middle, and back of a group where those positions are accessible. Notice whether nearby clothes move, whether the divider shifts, and whether the remaining contents are still identifiable.
Replace the items without rebuilding the whole row. This shows whether the arrangement supports normal use, including changing your mind about what to wear.
Close the drawer gently after each adjustment. A strap left over a wall or a waistband sitting upright may create an obstruction that was not visible from above.
Give newly washed clothes a predictable place
Put returning items in the same category each time. If you want to rotate through similar garments, you can place newly washed pieces behind the ones still clean and select from the front.
Use that approach only when the row remains easy to manage. Moving every piece to maintain a perfect order may add work without helping you choose clothes.
For broad bins, returning items to the correct category may be enough. The system can tolerate small differences in folding as long as the contents stay accessible.
Make small adjustments when something fails
If one compartment overflows while another stays empty, move the boundary or change the categories. An unused cell beside an overpacked one suggests the layout needs adjusting.
If people keep leaving clothes on top of an organizer, find out what makes the assigned spaces inconvenient. The cells may be too small, the folding method too involved, or the labels unclear.
Keep a photograph of the arrangement if that helps everyone restock it. Use it as a reference for where groups belong, not as a demand to recreate identical folds after every wash.
How can you organize a small underwear drawer?
Keep the clothing you use most often in the accessible space, use fewer bulky boundaries, and move occasional large pieces when necessary. Start by checking how much of the drawer is occupied by the organizers themselves.
Thick walls, wide rims, and gaps between several small boxes can consume space. A pair of broad sections may fit your clothing better than many individual cells.
Adjust the fold to the drawer
A small change in fold width can allow a row to fit beside another category. Keep the fold loose enough for easy removal and do not force shaped garments into the remaining gap.
Try turning a row through a quarter turn if access allows it. A drawer wider than it is deep may accommodate short side-by-side rows more comfortably than long rows running front to back.
Keep the direction consistent within each group so you can see the edges you use to identify the items. Consistency helps selection even when the folded pieces are not identical.
Keep daily access separate from occasional storage
A garment worn only with one outfit does not need the same position as daily underwear. Place it in a suitable secondary area if keeping it in the main drawer blocks access to the everyday supply.
Use a small label or a familiar grouping so the moved piece is still easy to find. Do not solve a crowded drawer by creating an unmarked pile elsewhere.
Before relocating clothing, check whether a single oversized organizer is causing the problem. Sometimes changing the boundary is enough, without reducing the contents or adding storage furniture.
Leave space for your hand
A drawer packed edge to edge may look efficient but be difficult to use. You need room to lift a garment and return it without pulling several neighbors out.
Test this with the largest folded item in each category. If your fingers cannot reach its edges, widen the section or remove some contents.
Leave a gap at the edge of a removable bin if you need it to grip and lift the container.
Can you organize underwear without buying dividers?
Yes. Use broad zones, short folded rows, or suitable containers you already own. Add a purchased organizer only when you have identified a problem that the existing arrangement cannot handle conveniently.
A clean, dry, smooth-sided box can separate socks from underwear. Check it for staples, rough corners, residue, and a height that could interfere with the drawer closing.
Reuse containers carefully
Try the box empty first, then with a few folded items. If its sides bow or its shape makes removal awkward, use it elsewhere instead of forcing it into the drawer.
Cardboard boxes are useful for testing a layout in a dry drawer, but their care differs from washable containers. Replace a damaged or soiled box as appropriate; do not assume you can soak it clean.
Avoid adding adhesive or lining materials without checking compatibility with the furniture finish. A removable arrangement is easier to adjust while you are still deciding where each category belongs.
Use the drawer’s own shape
A narrow drawer may naturally support one row of folded underwear. Its side walls can act as boundaries if the garments remain visible and easy to remove.
In a wider drawer, two loose groups may work while the supply is full but mix as it empties. Observe that change before deciding whether a divider is needed.
You can use an existing small bin for the category that moves most, leaving the rest open. The result does not need to look like a complete matched set to be useful.
Fix the problem that keeps making the drawer messy
A drawer often becomes disorganized at a particular point: when a row empties, when clothes return, or when someone reaches for an item at the back. Identify that moment before replacing all the organizers.
Folded underwear keeps falling over
Shorten the row or place it in a smaller section. A partly empty long row may need a movable end boundary as garments go into the laundry.
If the fabric is too slippery to stand, switch that group to a shallow bin or flatter arrangement. Repeatedly making a tighter fold is not the only way to keep the category together.
You cannot find a specific pair
Check what is visible once the item is stored. A waistband, trim, or contrasting edge may be a more useful identifier than the folded surface currently facing up.
For very similar items, separate by the difference you need to recognize. Avoid introducing subdivisions you never use when choosing clothes.
The drawer becomes full after every wash
Compare the returned supply with the room you originally reserved. Include clothing that was missing from the first sorting session.
Then check whether containers occupy unnecessary space. If the actual clothing still exceeds what fits comfortably, move a category or review what needs to stay in the daily drawer.
The organizer slides or changes shape
Check assembly and installation first. A fabric insert may need its base fully positioned, and an adjustable divider may be outside its intended fitting range.
Follow the product’s instructions for any approved stabilizing method. Do not wedge an unsuitable object against the drawer mechanism or use extra tension to force a divider to stay put.
Putting clothes away takes too long
Reduce the number of categories or simplify the fold. A broad section for daily briefs may work better than assigning a separate cell and detailed tuck to each pair.
After the next wash, notice which items return to their places and which remain outside. Simplify the sections causing that delay.
Keep the drawer and organizers easy to care for
Remove loose lint and inspect the drawer when it is partly empty. Clean the furniture and containers according to their separate instructions, then let them dry before replacing clothes.
A fabric-covered organizer may contain an insert that limits how it can be cleaned. A removable base does not establish that the remaining shell is machine washable; check the care information for the complete product.
If clothing catches, inspect the contact point for a rough edge, damaged seam, exposed fitting, or misplaced divider. Remove or correct the source before returning delicate items to that section.
Keep liquids and strongly scented products away from direct contact with underwear. A tidy layout does not need fragrance to work, and a spill can affect both the clothes and the furniture finish.
Review the layout when the contents change or a section becomes awkward. Routine cleaning is another opportunity to check for damaged edges and misplaced fittings.
Frequently asked questions
What is the best way to organize an underwear drawer?
Empty it, sort by useful categories, and measure before choosing containers. Place daily items within reach and use folds that fit the available height. Test the arrangement after a full laundry return, including removing and replacing individual garments.
Is it better to roll or fold underwear?
Choose the method that suits the garment and compartment. Flat folds suit shallow spaces, while upright rectangles can make a row visible from above. Loose rolls may fit some cells. Test a few pieces rather than assuming one method always saves the most space.
Can bras and underwear share a drawer?
Yes, if shaped bras have enough room and smaller items remain accessible beside them. Plan the bra area first, then fit underwear sections around it. Keep hooks and straps from catching delicate neighboring garments or the drawer mechanism.
Should you fold one bra cup into the other?
Avoid turning a shaped cup inside out merely to make the bra smaller. Preserve the garment’s natural shape and follow its manufacturer’s storage advice. Nesting compatible separate bras together is different from inverting a cup within one bra.
Do you need one compartment for every pair?
No. Broad bins or short rows can work well, particularly when the amount of clean underwear changes throughout the week. Individual cells help only when they fit the garments and make finding or returning them easier.
How do you organize underwear in a deep drawer?
Keep everyday items visible and reachable without removing several layers. A compatible removable tray may help, but only if it fits and can be handled comfortably. It is also reasonable to leave some height unused to preserve access.
How many pairs should fit in one drawer?
There is no standard number. Drawer size, garment size, fabric bulk, folding method, and organizer walls all affect capacity. Allow room for your normal clean supply and for removing items without pulling everything out.
Can you wash fabric drawer organizers?
Only if their care instructions permit it. Fabric boxes can contain support panels, trim, or other parts that restrict washing. Follow the product’s own cleaning directions and dry it as required before returning clean underwear.
How can you keep matching underwear sets together?
Use neighboring sections or a shared group when the pieces fit without pressure. Keep the smaller item visible and avoid stuffing it into shaped cups or securing it with stretched elastic. If you wear the pieces separately, sorting by type may be more convenient.
What if the drawer still looks untidy after organizing?
Check whether you can find an item, remove it, return it, and close the drawer easily. Uneven folds may be harmless. Overflowing sections, trapped straps, hidden clothing, or repeated sorting indicate a practical problem worth adjusting.
Choose organizers around the clothes you store
Use your drawer measurements and a few representative garments to judge each organizer. A broad section for bras, a short row for briefs, and a small bin for socks may serve you better than identical cells across the entire space.
Great Shine’s closet and drawer organizer range includes foldable closet drawer organizers. Use the layouts above to identify which structure would suit your drawer, then check the dimensions, usable compartments, and care instructions for the particular design.