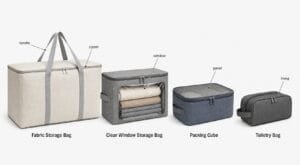
If you’ve ever sourced travel organizers, you’ve probably held a packing cube and thought, “It’s just fabric and a zipper — how different can one factory be from another?”
I get that impulse. I started in this industry 16 years ago as a fabric sourcing assistant, and I used to think the same thing. Back then I’d walk factory floors at 5 a.m. counting stitches, weighing fabric swatches, and arguing with production managers about why a 2mm size deviation actually matters. Today I run GreatShine, our own storage manufacturing brand with an in-house R&D and production team, and I can tell you this: the gap between a $1.00 packing cube and a $2.50 packing cube is not marketing. It’s engineering, material science, process control, and thousands of tiny decisions most buyers never see.
A low-quality cube splits at the seams after three trips, zippers jam, and fabric pills. A well-made one lasts for years, holds its shape, and becomes the kind of product customers leave 5-star reviews for and reorder again. The difference is entirely in how it’s made.
This is not a surface-level “how it’s made” list. I’m going to walk you through every stage of production with the actual specs, tolerances, common failures, and expensive mistakes we’ve learned from over 16 years. You’ll learn exactly where corners get cut, how to audit a supplier’s real capability, and why the cheapest quote almost always costs you more in the long run.
Step 1: Pattern Engineering & Pre-Production Sampling — Where 90% of Quality Problems Are Born
Most people call this “making a sample.” We call it pattern engineering, because a bad pattern will ruin an entire production run no matter how good your sewing operators are.
What actually happens at this stage
A packing cube looks like a simple rectangular box, but it has to maintain shape when fully stuffed, zip smoothly without puckering, and sit flat when empty. Our pattern technicians don’t just draw rectangles — they calculate:
- Seam allowance by fabric type: Woven polyester gets a standard 1cm seam allowance; stretch mesh gets 1.2cm to account for tension pull during sewing.
- Corner structure: Budget cubes use flat mitered corners that collapse when full. Mid-range and premium cubes use 3D structured corner patterns that hold their cubic shape even at maximum capacity. The tooling for 3D corners adds about 8% to production cost, but it’s the single biggest visual and functional upgrade you can make.
- Zipper path compensation: Fabric and mesh stretch differently when sewn to a zipper tape. If the pattern doesn’t account for that, the zipper will wave and buckle — the #1 visual complaint customers have about cheap packing cubes.
Before we even cut production fabric, we run a fabric shrinkage pre-test. Every fabric roll is washed and dried per ISO 6330 standards to measure how much it shrinks. If we skip this step and cut at full size, the cubes will come out 3–5% smaller after the customer’s first wash. We learned this the hard way in 2014: a 10,000-piece order came out undersized because we used a new fabric without pre-shrinking the pattern. We remade the entire order at our cost. That was a $40,000 lesson we never forgot.
Standard sampling workflow at GreatShine
- White sample: Unprinted, unbranded cut-and-sew sample to verify dimensions, shape, and construction.
- Color strike-off sample: Fabric dyed to the customer’s Pantone reference, approved for color match.
- PP (Pre-Production) sample: Full finished sample with logo, zippers, and all final materials. Signed off in writing by both sides before bulk production begins.
EEAT factory insight: If a supplier says they can skip the PP sample and go straight to bulk to “save time,” walk away. That is the single strongest red flag for upcoming quality disasters.
Step 2: Raw Material Sourcing & Incoming QC — The Real Reason Prices Vary So Much
This is where the vast majority of cost cutting happens. A 20% price difference between two quotes is almost never labor cost — it’s material downgrades you can’t spot in a product photo.
Let’s break down the core components and what you should actually be auditing:
1. Main body fabric
This is 60% of the material cost, and the most commonly fudged spec.
| Fabric Type | Common Use Case | Real Spec Standard | Common Cheap Shortcut |
|---|---|---|---|
| 210D Polyester | Entry-level budget sets | 210D, 72T weave, PU coating | Supplied as 190D or 68T weave — thinner, tears easier |
| 300D Oxford Polyester | Mid-range retail bestsellers | 300D, 100T weave, water-repellent coating | 250D mislabeled as 300D; no real water repellent finish |
| 420D Nylon Ripstop | Premium outdoor / travel brands | 420D nylon, ripstop grid pattern, DWR finish | Polyester ripstop sold as nylon; no DWR treatment |
| GRS-Certified rPET | Eco-focused brand lines | 100% recycled polyester, traceable supply chain | Virgin polyester labeled as recycled; no valid GRS certificate |
Our incoming QC standard: Every fabric roll is weighed, tested for tear strength (ASTM D1424), and checked for color fastness to rubbing (ISO 105-X12). If weight is off by more than ±5% or color fastness is below Grade 4, the roll is rejected and sent back to the dye house.
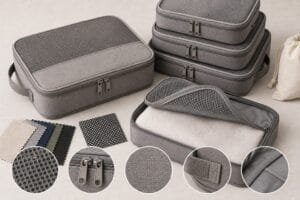
2. Mesh panels
The top mesh window is the weakest point of most packing cubes.
- Standard: 75D polyester hexagonal mesh, 120g/m², heat-set edge
- Common shortcut: 50D thin mesh that stretches, pills, and tears when you push bulky clothes inside
- Premium upgrade: Tear-resistant diamond mesh with reinforced binding — adds ~$0.15 per unit but cuts mesh-related returns by 70% based on our data.
3. Zippers
I cannot overstate how much zippers define perceived quality.
- Industry standard for packing cubes: #3 nylon coil zipper
- Our baseline: Branded #3 zippers with auto-lock sliders. Auto-lock means the zipper doesn’t slide open on its own when the cube is stuffed — a tiny detail customers notice immediately.
- Common shortcut: No-name zippers with thin coil teeth that skip, jam, or split after 100 opens.
- Premium option: #3 reversed coil zippers for a clean, seamless look — common on high-end luggage brand lines.
In 2018 we switched to a cheaper zipper supplier to hit a client’s target price. Within 6 months we had over 300 reported zipper failures. We covered every replacement and switched back to our trusted supplier immediately. Saving $0.12 per unit cost us tens of thousands in reputation, rework, and lost long-term business. It was never worth it.
4. Smaller 辅料 (supplies) that make a big difference
- Sewing thread: We use high-tenacity 40/2 spun polyester thread. Cheap factories use 60/3 thin thread that breaks under tension.
- Webbing handles: 20mm wide polypropylene webbing, 2mm thick. Thin webbing digs into hands and frays at the edges.
- Binding tape: Used for internal raw edges. Cheap cubes skip internal binding entirely, leaving raw fraying edges inside.
Step 3: Cutting — Precision At This Stage Saves Headaches Later
With all materials approved, we move to cutting. This stage is where production efficiency and dimensional accuracy are decided.
The process
- Marker making: Our CAD technicians arrange pattern pieces digitally on a fabric layout to minimize waste. A good marker can achieve 85–90% fabric utilization; a bad one wastes 15% more fabric. This is one way factories can hit a lower price — they just waste more material, but you don’t see it.
- Spreading: Fabric rolls are laid flat on the cutting table in layers. For standard polyester, we lay 24 layers max. For stretch mesh, we lay only 12 layers with zero tension, because stretched mesh will shrink back after cutting and produce misshapen pieces.
- Cutting: For large runs we use a computer-controlled straight knife cutter with ±1mm accuracy. Small factories use hand-held cutters with ±3–5mm accuracy — which is why you’ll get cubes from the same batch that are slightly different sizes.
- Fabric inspection & sorting: Every cut piece bundle is visually inspected for fabric defects — stains, thin spots, dye inconsistencies. Defective pieces are pulled and replaced before they reach the sewing floor.
Factory truth: Many low-cost factories skip the piece inspection step. They sew defective fabric into the cubes and hope you don’t notice during final inspection. Over a 10,000-piece order, that can mean hundreds of defective units reaching the end customer.
Step 4: Branding Application — Logo Quality Makes Your Brand Look Premium Or Cheap
Before assembly, logos and branding are applied. The method you choose affects both cost and perceived quality.
1. Silk Screen Printing
- Best for: Simple 1–2 color logos on solid fabric
- Pro: Low cost per unit at high volume, durable
- Con: Not ideal for tiny details or gradient colors
- Quality check: Ink thickness should be even, no bleeding, and pass 20+ wash cycles without cracking. We always do a wash test on printed samples before bulk.
2. Heat Transfer / Sublimation Printing
- Best for: Full-color logos, detailed artwork, gradient designs
- Pro: Smooth finish, fine detail, no raised ink
- Con: Only works on 100% polyester; can feel plasticky if done poorly
- Critical note: Sublimation only works on white or light fabric. On dark fabric you need transfer film, which has a different hand feel.
3. Embroidery
- Best for: Premium product lines, brand elevation
- Pro: Luxurious textured look, extremely durable, high perceived value
- Con: Higher unit cost, longer lead time
- Quality standard: We use 75D embroidery thread with clean, dense stitching — minimum 40 stitches per cm². Loose, sparse embroidery looks cheap and ruins an otherwise premium product.
Pro tip for buyers: Always approve a physical logo sample on the actual production fabric. A logo that looks perfect on your screen can look completely different printed on textured 300D Oxford fabric. Color matching on fabric is notoriously tricky — we usually produce 2–3 strike-offs to hit an exact Pantone match.
Step 5: Sewing Assembly — The Heart of Production, Where Quality Is Built
Sewing is the most labor-intensive step, and the skill of the operators plus the rigor of the process is what separates a good factory from a bad one.
We use a modular production line where each operator specializes in one single step. This is slower to set up but produces far more consistent quality than having one sewer sew the entire cube from start to finish.
Standard assembly flow, with quality-critical details
- Mesh panel binding — The raw edge of the mesh is bound with matching fabric tape. This prevents fraying and gives a clean finished edge. Budget factories skip this step and sew raw mesh directly — it frays within months.
- Zipper installation — This is the most skilled operation. The zipper is sewn to the top frame with a guide strip to keep it perfectly straight. No guide strip = wavy zipper, every time. We also reinforce both zipper stops with bar tacks so the slider never flies off the end.
- Side panel joining — The four side panels and bottom panel are sewn together to form the cube body. All internal raw seams are overlocked (serged) to prevent fraying. Premium lines get full internal binding for a clean interior finish.
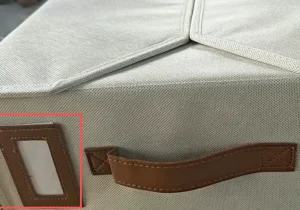
- Handle attachment — Webbing handles are sewn on and reinforced with 28-stitch bar tacks at both ends. This is non-negotiable. I’ve seen cheap cubes where the handle was attached with just a straight stitch — it rips clean off the first time someone lifts a fully packed cube.
- Top-to-body joining — The zippered top assembly is sewn to the cube body. The final seam is top-stitched for a clean, professional look and extra strength.
- Final thread trimming — All loose threads are trimmed inside and out.
Our sewing quality standards (the numbers you should ask your supplier for)
- Stitch density: 10–12 stitches per inch (SPI). Budget factories run 6–8 SPI. More stitches per inch = stronger seams, but there is a sweet spot — too many and you perforate the fabric.
- Stitch alignment: ±0.5mm tolerance from the seam edge.
- Bar tacks on all stress points: handles, zipper ends, corner seams.
Step 6: In-Process & Final Quality Control — How We Catch Defects Before They Ship
Quality control is not one final check at the end. It’s a system built into every step. At GreatShine we run three layers of QC:
1. IPQC (In-Process Quality Control)
Inspectors walk the production line every hour and check work at each station. If they find a recurring issue — for example, inconsistent stitch width at the zipper station — they stop the line immediately, retrain the operator, and rework all pieces produced since the last check.
This is the most important and most commonly skipped QC step. Factories that only do final inspection end up with thousands of defective units that have to be reworked or scrapped — and sometimes they just ship them anyway.
2. FQC (Final Quality Control)
Every single finished cube goes through a full inspection checklist:
- Dimensions within ±0.5mm of spec
- Zipper opens and closes smoothly 5+ times without jamming
- No skipped stitches, loose threads, or raw edges
- No fabric stains, marks, or color inconsistencies
- Shape is square and symmetrical
- Logo position and quality match approved sample
Units that fail are sent back for rework or marked for scrap.
3. OQC (Outgoing Quality Control)
Before shipping, we perform a random AQL 1.0 inspection on the finished packed cartons. That’s a stricter standard than the industry default of AQL 2.5. We test for:
- Pull strength: Handle supports 10kg static load for 24 hours without tearing
- Zipper durability: 500 open/close cycles without failure
- Color fastness: Dry rub Grade 4, wet rub Grade 3–4 minimum
- Wash shrinkage: ≤2% dimensional change after 3 wash cycles
Factory reality: If a supplier can’t tell you their AQL standard or show you their in-process QC records, they are almost certainly only doing a quick visual check and calling it QC.
Step 7: Finishing, Packaging & Shipping Preparation
Passed inspection, the cubes move to finishing and packaging. This is the last step, and it’s where a lot of factories drop the ball on presentation.
- Thread suction & cleaning: We use industrial thread vacuums to remove loose lint and stray threads from inside and outside the cube. Hand-trimming alone always misses some.
- Folding & shaping: We fold each cube to a standard size using a folding jig. This may sound trivial, but if a cube is folded randomly and compressed in a carton for 4–6 weeks of ocean shipping, it arrives with permanent creases that never come out. We have a standard folding procedure to minimize creasing and maximize unboxing appeal.
- Individual packaging: Most clients use clear OPP bags with product insert cards. Premium lines use kraft paper bags or compostable packaging for eco positioning.
- Master carton packing: Cartons are sealed, strapped, and labeled. We perform a 1.2m drop test on every new carton design to make sure products survive last-mile delivery. For ocean freight we add inner poly bags and desiccant packs to prevent moisture damage during transit.
Bonus: The Real Difference Between Budget, Mid-Range, and Premium Packing Cubes
After 16 years, I can look at any packing cube and tell you within 10 seconds what tier it’s in. Here’s the breakdown so you can too:
| Category | Budget | Mid-Range | Premium |
|---|---|---|---|
| Fabric | 190–210D thin polyester | 300D Oxford polyester | 420D nylon ripstop / rPET |
| Zipper | Generic #3, no auto-lock | Branded #3 auto-lock | Reversed coil, premium slider |
| Internal seams | Raw edges or cheap overlock | Fully overlocked | Fully bound internal seams |
| Corners | Flat folded | Semi-structured | 3D structured corners |
| Handles | Single stitch | Bar tack reinforced | Wide webbing, double bar tacks |
| QC standard | Final visual check only | AQL 2.5 final inspection | In-process QC + AQL 1.0 |
| Typical FOB price | $0.80–$1.30 | $1.40–$2.20 | $2.30–$3.50+ |
5 Costly Manufacturing Mistakes Every Sourcer Should Avoid
To wrap this up, here are the five most common and most expensive mistakes I see buyers make, over and over again:
- Chasing the lowest quote without checking specs. If one quote is 25% cheaper than everyone else, they are not using the same materials. They are downgrading fabric, skipping QC, or using unbranded zippers. You will pay for it in returns.
- Skipping pre-production samples to save time. Rushing to production always takes longer in the end, because you’ll be fixing problems you could have caught in the sample stage.
- Not specifying material standards clearly. If you just say “210D polyester” with no weight, weave, or test requirements, you will get the cheapest 210D the factory can find.
- Ignoring compliance requirements upfront. If you sell into the EU, REACH compliance is not optional. If you market as recycled, you need a valid GRS certificate. Ask for documentation before production, not after the goods are finished.
- Treating QC as an afterthought. Good quality is built into the process, not inspected in at the end. Ask about in-process QC, not just final inspection.
Final Thoughts
After 16 years and millions of packing cubes produced, my core belief hasn’t changed: good manufacturing is transparent. There’s no magic, no secret sauce — just attention to detail, clear standards, and a refusal to cut corners that hurt the end customer.
At GreatShine, we built our entire business on this. I’d rather walk you through exactly why a premium zipper matters and show you our test data than quote you the lowest possible price and ship you a product that damages your brand. If you’re working on a custom packing cube project, or you’ve had quality issues with your current supplier and you’re not sure why, feel free to reach out or drop a comment. I’m always happy to talk shop — and maybe save you from some of the expensive mistakes we made earlier in our journey.
Thanks for reading,
Grace
Founder, GreatShine