A compression packing cube zipper can get stuck because clothing presses into its path, loose fabric enters the slider, or the zipper and sewn panels do not stay aligned. Check the cube empty first, then with a defined clothing load. A snag that repeats at the same corner with the cube empty needs a different investigation from resistance that appears only after overfilling.
For travel brands and private label sellers, a useful sample report identifies which zipper stopped, where it stopped and what was inside the cube. That record gives the factory a specific problem to review. The checks below are proposed inspection methods, not results from a tested Great Shine sample.
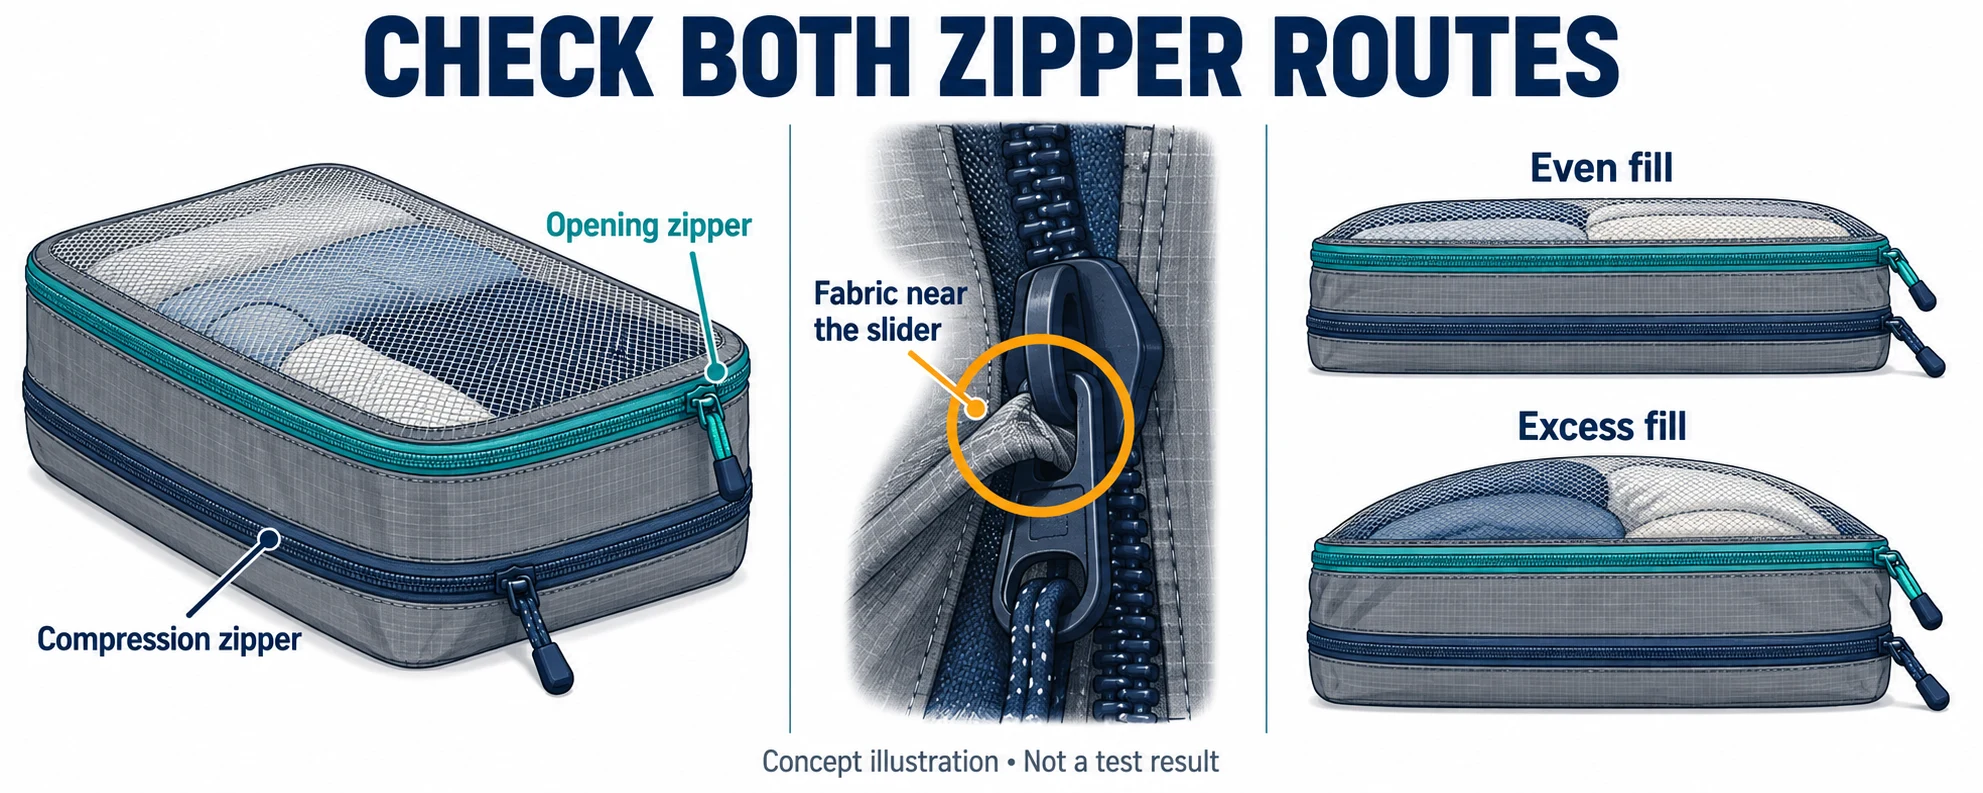
Quick answer: stop pulling and identify the obstruction
When a slider resists movement, stop adding force. Reduce pressure from the contents where possible and inspect the slider entrance, nearby fabric and zipper chain. If fabric is caught, gently ease it clear while moving the slider back slightly, provided it moves without force. Stop if the obstruction will not release.
YKK’s zipper precautions warn against forcing a rough-moving slider or closing an overfilled bag by force. They also discuss trapped fabric and the need to leave room around the slider when sewing. These are general technical references; they do not identify the zipper brand used in a Great Shine product.
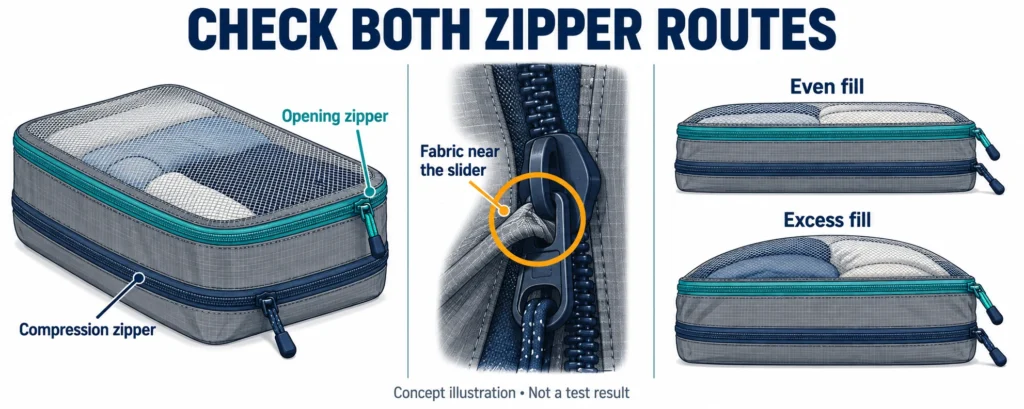
Identify the opening zipper and the compression zipper
Many compression packing cubes have one zipper around the opening and another around an expandable gusset. The opening zipper closes the compartment after packing. The compression zipper reduces the gusset depth once the main compartment is closed, following the product’s instructions.
Mark the two routes on the sample photo. They may use similar pulls, so “the zipper jams” can refer to different parts of the construction.
For a typical two-route design, begin with the compression gusset released. Pack the cube, close the main opening normally, and then operate the compression route as instructed. If the opening zipper already needs force to close, resolve that condition before trying to compress the bag.
Do not treat a second puller on the same opening zipper as proof of a compression system. Confirm which seam or gusset each route operates. Some packing cube designs use a different closure arrangement and need a corresponding inspection sequence.
Use the symptom to locate the problem
Where and when resistance appears narrows the inspection. It does not prove a cause without looking at the sample.
The empty cube catches at the same point
Inspect that point without clothes inside. Look for loose thread, binding or seam allowance near the slider, a distorted chain, uneven zipper tape, and a sharp change in the sewn route.
Record whether it catches in both directions and whether supporting the panel flat changes the result. Do not assume the hardware is defective before checking the sewing around it. A repeatable empty-cube snag should be resolved before a loaded sample is approved.
The cube closes empty but catches when filled
Start by removing the load and recreating the agreed packing arrangement. A thick fold at a corner can push outward even when other areas are loosely filled. Clothing caught near the main opening can also remain trapped when the user starts compressing.
If redistributing or reducing the contents removes the problem, record what changed. Then ask whether the revised load still represents the use promised to the customer. A cube that works only with less clothing than the agreed target load still needs a design or product-claim decision.
The slider stops at a corner
Check the curve with the gusset released. Look for a tight turn, puckering, bulky seam joins and fabric folding into the path as the slider approaches. Compare the corner with the opposite side and with the same position on another sample of that size.
If the factory proposes a revised corner radius, check its effect on the finished dimensions and compression depth as well. Enlarging the curve may change usable space or panel shape; replacing the puller alone may not address the underlying obstruction.
The gusset, lining or mesh enters the slider
Photograph the trapped material before releasing it. Identify whether it comes from the lining, expandable gusset, mesh panel, binding or the clothes themselves.
Ask the factory to review fabric clearance, seam allowance and how the relevant panel is controlled. A guard or revised seam position may be worth sampling, but its width and stiffness must suit the actual construction. A proposed guard can create its own interference if it folds into the route.
The chain opens behind the slider
Treat this as a separate symptom from a fabric snag. Unload the cube and ask the factory to inspect chain engagement, slider compatibility, component condition and the pressure created by the packed contents.
Do not continue pulling harder or accept a sample merely because it can be closed once after repeated attempts. Avoid using pliers to alter the slider during approval: that changes the component being evaluated and can conceal the original problem.
Symptom, inspection point and factory action
Use the table to write a specific revision request. The actions are questions for sample review, not prescribed repairs for every zipper.
| Observed problem | Where to inspect | What to ask the factory to confirm |
|---|---|---|
| Empty cube catches at a repeatable point | Chain, loose thread, tape alignment and nearby seam | Identify the obstruction and show the same route operating after the correction. |
| Opening zipper resists only with clothes inside | Packing height, lid edge and clothing near the chain | Confirm the target load and whether panel depth or the packing instruction needs revision. |
| Compression zipper stops at a corner | Curve, seam joins, gusset folding and panel tension | Review the sewn route and clearance; sample any geometry change before approval. |
| Lining or mesh catches in the slider | Fabric edge, seam allowance and attachment position | Confirm the exact material being trapped and the proposed clearance or fabric-control change. |
| Cube twists as compression progresses | Opposing panels, zipper tape and uneven load | Separate packing imbalance from pattern or sewing misalignment; retest with the reference load. |
| Chain separates behind the slider | Component match, chain condition and load | Inspect the zipper assembly and loading requirement; do not classify it only as a tight corner. |
| One size in a set behaves differently | Its own pattern, curve, gusset and fill arrangement | Approve each size against its own defined load instead of accepting the whole set from one sample. |
Compare empty, target-fill and fuller conditions
Keep the sample and the base clothing set constant during comparison. Photograph the folding arrangement so a second person can repeat it. Record any change instead of comparing vaguely described “normal” and “full” cubes.
Stage 1: establish the empty baseline
Inspect both routes, then operate them in the sequence specified for the product. Note the exact position of any stop, hesitation or fabric contact. Use a photo with numbered corners or a marked seam reference so the factory can find the same place.
Record the sample revision, cube size, material configuration and zipper references available from the supplier. Do not add lubricant before the baseline check; doing so changes the sample condition and can hide a construction issue.
Stage 2: use the agreed target load
Choose garments that represent the intended use. List each item, its quantity and folding method. Record the total clothing weight and the uncompressed packed dimensions if those measurements form part of the project specification.
Place the load evenly, keep fabric clear of the closing route, and follow the product’s closure sequence. Observe the main opening and compression zipper separately. Record whether a snag occurs, whether the cube twists, and whether the user has to rearrange contents to finish.
A hand-feel description such as “harder to pull at corner B” is useful when linked to a location and video. It is not a measured pull-force result. If the buyer needs a numerical operating-force limit, agree the equipment, pull direction, speed and acceptance condition with a competent testing party.
Stage 3: examine a fuller condition without forcing closure
Start with the same base garment set and document any added item or changed fold. This makes the fuller condition traceable. Do not quietly replace soft shirts with dense rolled garments and describe the comparison as the same load.
Observe where the extra bulk approaches the chain and whether the closing path remains accessible. Stop if normal operation requires force or material is being trapped. The purpose is to identify a practical filling limit and a possible misuse point, not to make every overloaded arrangement pass.
If a design needs the user to keep a finger beside the gusset, demonstrate the intended technique in the instructions and check whether it remains practical throughout the route. A technique that cannot prevent repeated snagging under the agreed load should trigger further review.
Put the findings into the sample confirmation sheet
For each snag, capture a short continuous video that shows the starting condition, zipper route and stopping point. Pair it with a close-up of the obstruction. A photo of a closed cube cannot show whether it closed normally or only after repeated attempts.
Use these fields in the review record:
- Sample ID, revision, size and date.
- Opening or compression zipper, including supplier component reference where available.
- Condition: empty, agreed target load, or documented fuller load.
- Garment list, fold arrangement, loaded dimensions and weight where measured.
- Location and direction of the snag, with photo or video reference.
- Visible fabric contact, distortion, chain separation or seam changes.
- Proposed factory adjustment, revised sample reference and retest result.
- Decision: approve, revise or not checked, against the agreed requirements.
State the intended number of sample operations if the project has one, and record what was actually completed. Do not turn a few successful closures into a lifespan claim. Durability testing requires its own method, load, cycle count and failure criteria.
After the factory changes the pattern, lining, mesh, binding, zipper or gusset, repeat the affected checks using the reference clothing load. Keep the previous and revised records together. A visually cleaner seam is useful only if the functional problem has also been resolved.
Prepare a focused compression-cube brief
Send the target finished dimensions, the intended clothing load, preferred packed depth and the compression arrangement you want to evaluate. Include the snag record if a reference sample is available. Confirm each size separately when developing a set.
Great Shine’s custom compression packing cube options provide a starting point for discussing the gusset, zipper route and panel construction. Bring the target-load record into that discussion so the sample can be judged against the product your customers will use.
Frequently asked questions
Is a bigger zipper always the answer to snagging?
No. A different zipper may change handling, but it cannot by itself correct fabric entering the slider or a poorly aligned sewn route. Ask the supplier to identify the cause before changing the component specification, then test the complete revised cube.
Should I lubricate a stiff sample before evaluating it?
Record the as-received condition first. Seek product-specific advice before applying any treatment, since it can affect fabrics, finishes and the comparison. Lubrication should not replace review of trapped material, sewing clearance or an overfilled load.
Can an empty zipper check establish compression packing cube quality?
It can reveal some hardware and sewing problems, but it leaves the loaded behavior unexamined. Check the intended clothes, folding arrangement and compression sequence as well as appearance and dimensions.
What if the sample works after removing one garment?
Document the original and reduced loads. Decide whether the reduced load meets the product brief. If it does, revise the use instructions accordingly; if it does not, ask for a revised size or construction and repeat the trial.
How should a brand explain the two zippers to customers?
Use a clear product image that identifies the opening route and compression route, then show the sequence for that design. The instructions should make clear where clothing must stay out of the path and when the user should reduce the load instead of pulling harder.